









MiniMax H3 prompt: How to Create an AI Suspense Movie Intro with MiniMax H3
Learn how to turn six timed storyboard keyframes into a 15-second suspense movie intro in MiniMax H3, with graphic transitions, credits, and jazz-infused audio.
An effective suspense opening does not need a complicated plot. With a consistent visual language and six carefully timed keyframes, you can establish characters, clues, danger, and cinematic atmosphere in only 15 seconds.
This tutorial explains how to use MiniMax H3 on WeShop AI to create a 16:9 AI suspense movie intro from six storyboard keyframes. The example combines vinyl records, detective silhouettes, city nights, an evidence board, chase imagery, English credits, and suspense-jazz audio.
Who This Tutorial Is For
This workflow is useful for:
- filmmakers and short-form creators designing an opening sequence;
- podcast or video teams that need a reusable branded intro;
- designers turning static concepts into an animated pitch;
- marketing teams creating cinematic product or campaign teasers;
- social media creators producing suspense-led promotional videos.
The task is specific: transform six time-ordered keyframes and a structured prompt into a 15-second horizontal title sequence.
The expected result is not a conventional dialogue scene. It is an animated graphic sequence built from silhouettes, panels, typography, props, transitions, and music.
What the Finished AI Movie Intro Looks Like
The inspected output has the following technical properties:
- Duration: 15.08 seconds
- Resolution: 2560 × 1440
- Aspect ratio: 16:9
- Frame rate: 24 fps
- Video codec: H.264
- Audio codec: AAC
Its visual language combines a retro Japanese animated title sequence with comic-book collage design:
- deep navy, electric blue, purple, orange, and red;
- hard-edged character silhouettes;
- asymmetrical split screens;
- oversized English letterforms used as masks;
- sparse Japanese decorative lettering;
- condensed uppercase English credits;
- outlined panels and printed texture;
- hard cuts, red-line wipes, masks, and panel reassembly.
Step 1: Prepare Six Time-Ordered Keyframes
The six supplied images are not interchangeable style references. They are storyboard keyframes assigned to specific points on the timeline:
| Keyframe | Intended time | Main visual function |
|---|---|---|
| Keyframe 1 | 0 seconds | Establish the vinyl record and detective motif |
| Keyframe 2 | 3 seconds | Reveal the title, train setting, and cast |
| Keyframe 3 | 6 seconds | Introduce pursuit and faster comic panels |
| Keyframe 4 | 9 seconds | Shift into investigation and the evidence board |
| Keyframe 5 | 12 seconds | Build a typographic visual climax |
| Keyframe 6 | 15 seconds | Finish with an ensemble composition |
This distinction matters. When the images are treated as timed keyframes, the model should move through them in order and create motion between adjacent compositions. It should not freely combine all six images throughout the video.
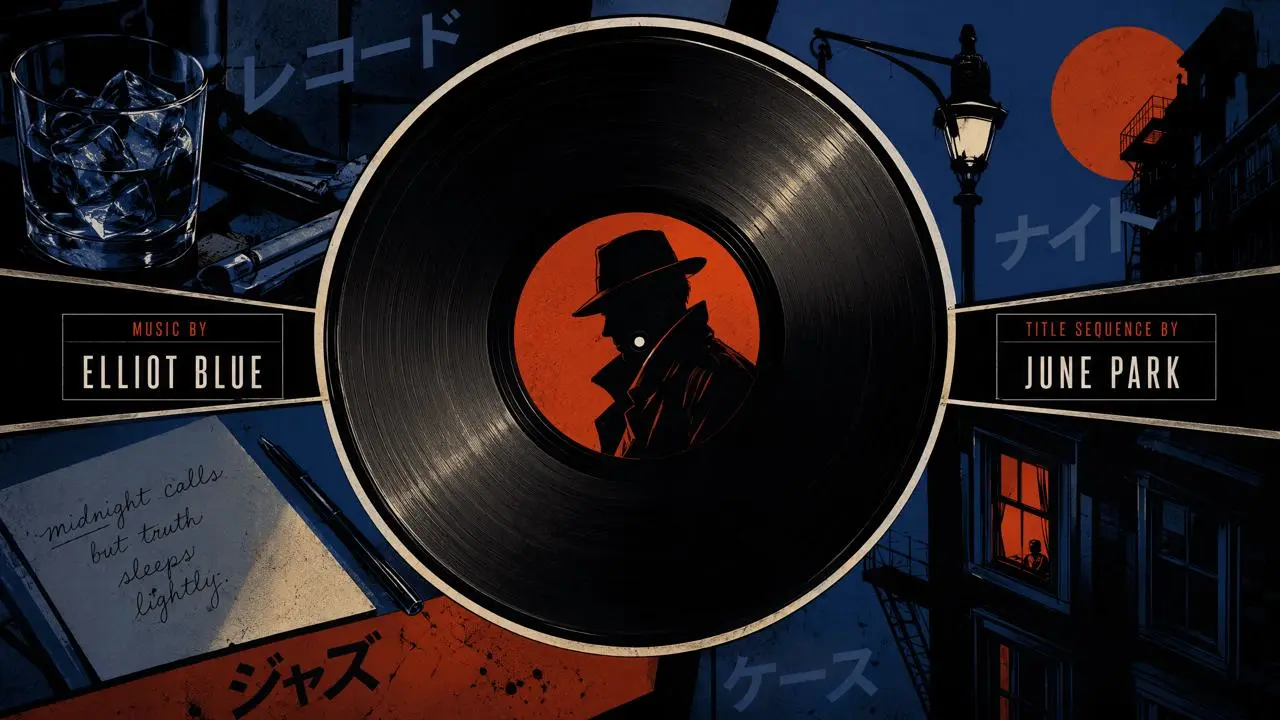
Keyframe 1 at 0 Seconds: Establish the Central Motif
The first keyframe centers a large vinyl record containing the silhouette of a detective in a hat. A whiskey glass, handwritten note, streetlamp, red moon, dark windows, and framed credits surround it.
This frame establishes:
- the opening composition;
- the detective as the central character;
- the vinyl record as a recurring visual motif;
- the navy, black, and orange palette;
- the retro jazz-crime atmosphere;
- the outlined English credit style.
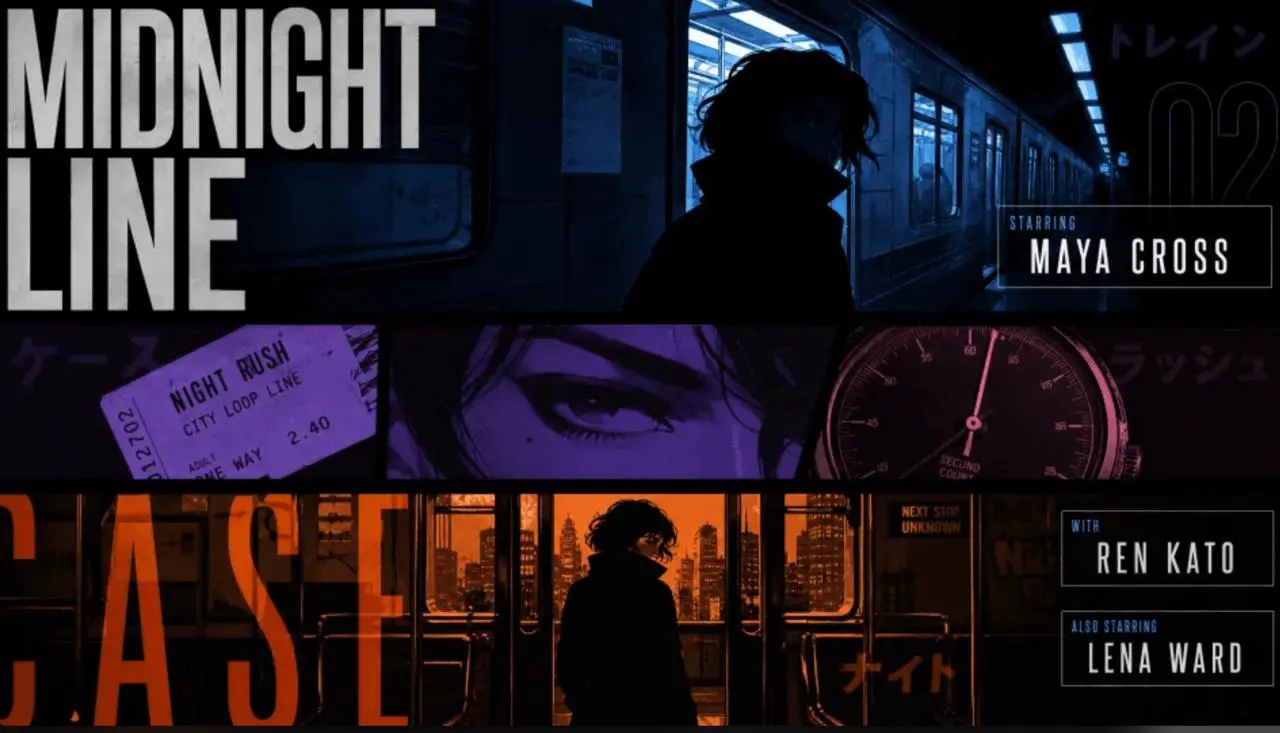
Keyframe 2 at 3 Seconds: Reveal the Title and Cast
The second keyframe combines a night train, a shadowed character, oversized “MIDNIGHT LINE” typography, a ticket, an illustrated eye, a timer, and several cast-credit boxes.
This frame establishes:
- the primary title treatment;
- horizontal split-screen panels;
- the night-transit setting;
- condensed uppercase typography;
- sequential cast-name reveals;
- the contrast between cold blue and warm orange.
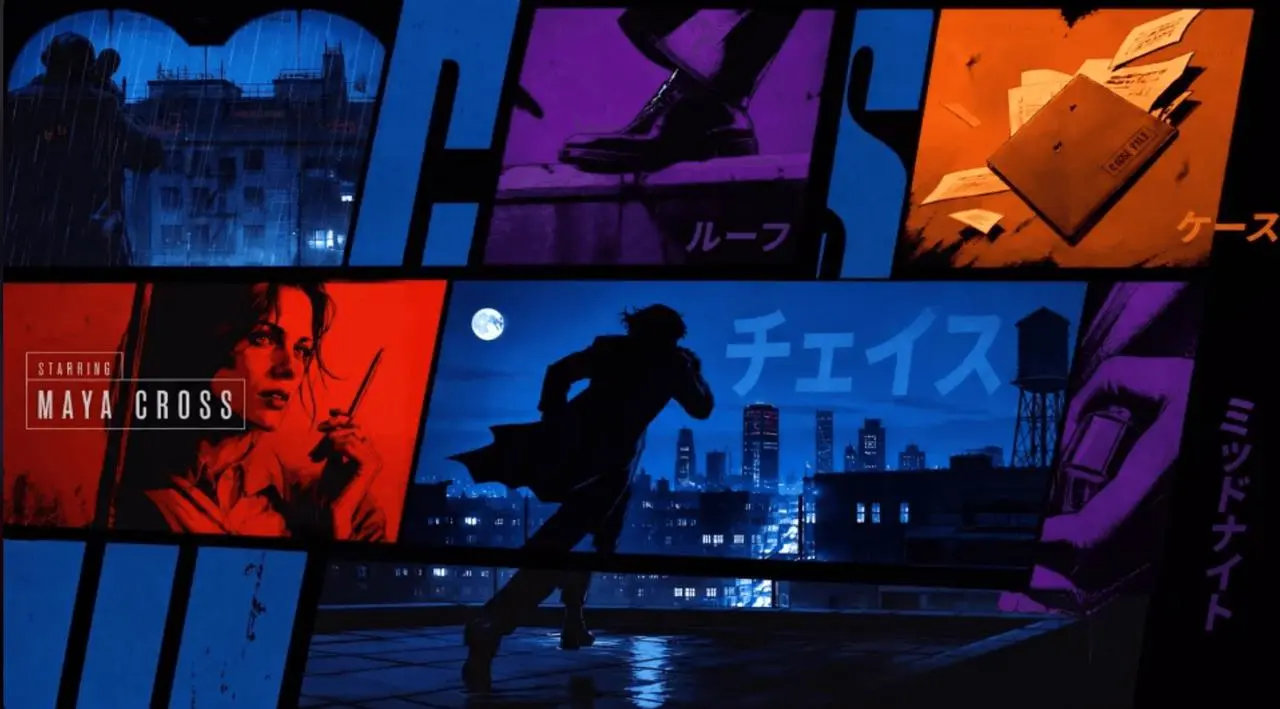
Keyframe 3 at 6 Seconds: Introduce Pursuit
The third keyframe includes a rainy city, running silhouette, shoes, case file, communication device, illustrated character, and sharply angled panels.
This frame establishes:
- the beginning of the chase;
- rooftop or elevated-city movement;
- diagonal comic-panel construction;
- blue, purple, red, and orange color blocks;
- investigative props;
- a faster visual rhythm.
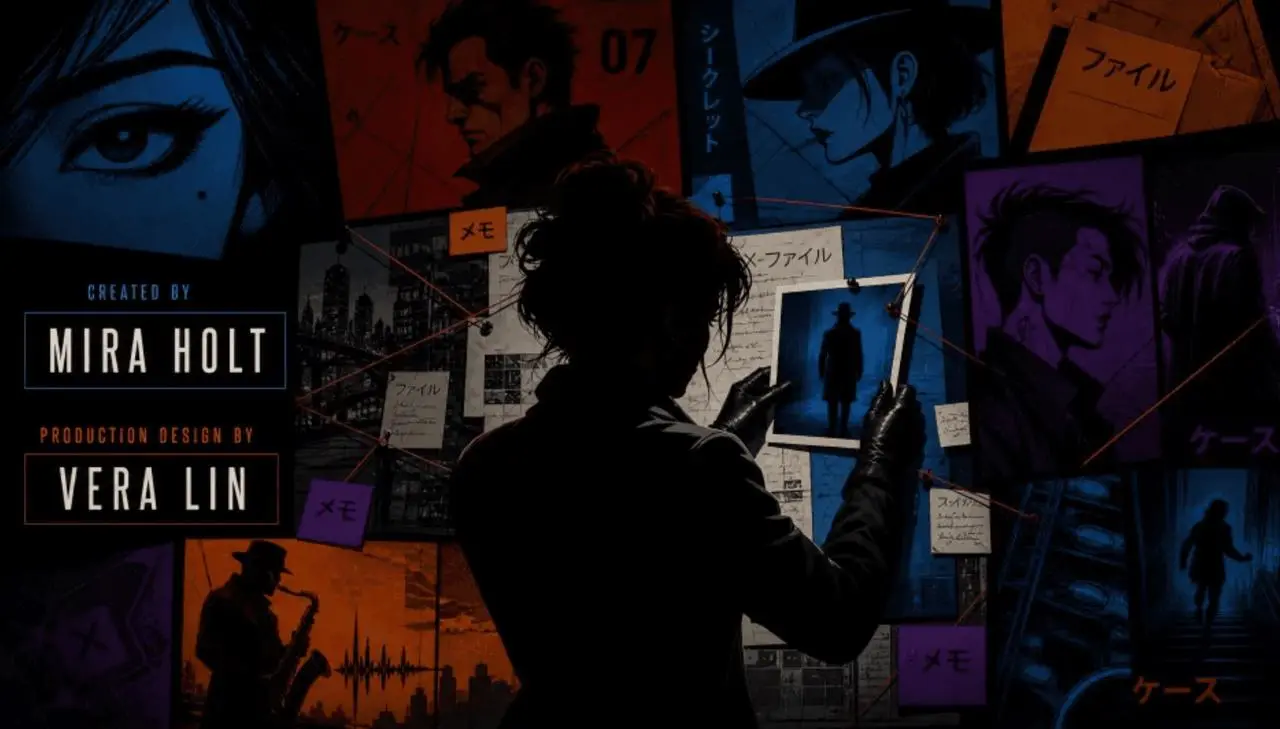
Keyframe 4 at 9 Seconds: Build the Investigation Scene
The fourth keyframe centers a back-facing investigator studying an evidence board filled with photographs, portraits, notes, sticky labels, and connecting red thread.
This frame establishes:
- the central investigation beat;
- the investigator’s back-facing silhouette;
- the evidence-board composition;
- red-thread transitions;
- portraits and clue photographs;
- production-credit layouts.
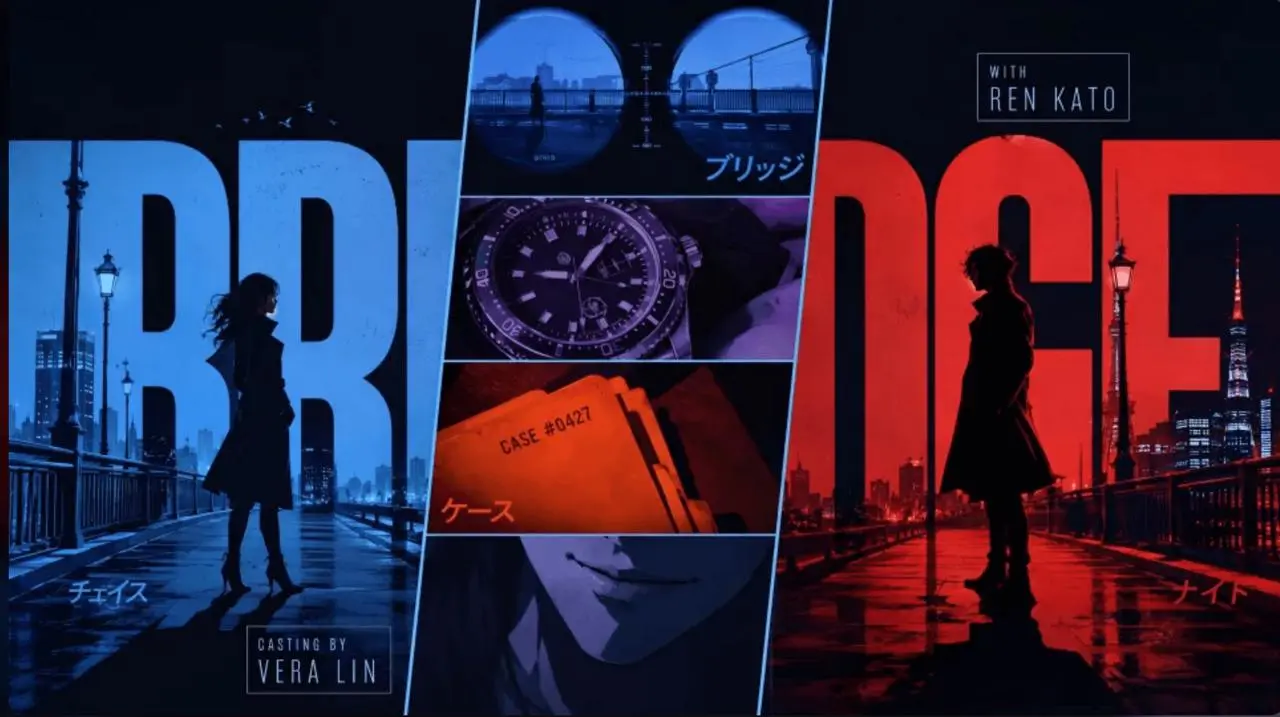
Keyframe 5 at 12 Seconds: Create the Typographic Climax
The fifth keyframe places character silhouettes against enormous blue and red letterforms. Narrow panels contain binocular imagery, a watch, a case folder, city views, and a bridge.
This frame establishes:
- oversized typography as scenery and masking;
- a blue-to-red escalation;
- narrow vertical panels;
- city and bridge silhouettes;
- investigative close-ups;
- a more urgent rhythm before the ending.
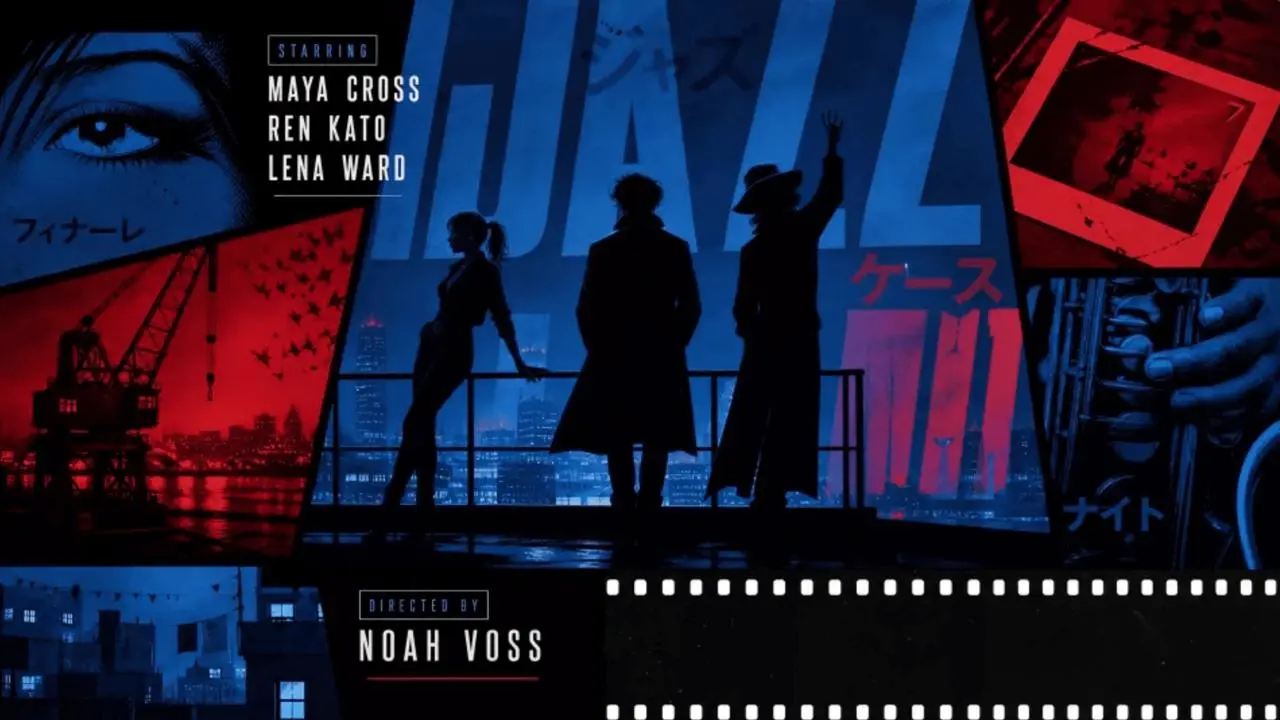
Keyframe 6 at 15 Seconds: Complete the Ensemble Ending
The final keyframe brings three character silhouettes together against the city. Surrounding panels contain an eye, a red photograph, industrial imagery, a mechanical close-up, film perforations, and the director credit.
This frame establishes:
- the final ensemble reveal;
- a wide closing composition;
- the filmstrip motif;
- the final credit;
- a clear visual endpoint for the animation.
Step 2: Turn the Six Keyframes into a Timeline
A vague request for a “suspense intro” gives a video model too much freedom. A timed storyboard provides clearer targets.
The six images divide the sequence into five transitions:
| Time range | Keyframe transition | Narrative function |
|---|---|---|
| 0–3 seconds | Vinyl detective → train and title | Establish the world and introduce the film |
| 3–6 seconds | Train and title → rooftop pursuit | Move from presentation into action |
| 6–9 seconds | Pursuit → evidence board | Turn movement into investigation |
| 9–12 seconds | Evidence board → giant typography | Escalate the graphic intensity |
| 12–15 seconds | Giant typography → ensemble ending | Resolve the sequence with a final cast image |
The model should preserve the order of these milestones. Each image is a destination on the timeline, while the prompt describes how one destination transforms into the next.
This approach also reduces indiscriminate visual mixing. The binoculars, case folder, evidence board, and three-person lineup do not need to appear in every shot. Each element becomes dominant only when its assigned keyframe approaches.
Step 3: Define Strict Credit Rules
AI-generated typography requires careful review. A credit may look plausible at thumbnail size while containing malformed or misspelled letters at full resolution.
The source prompt includes several useful constraints:
- Use English for all essential credits.
- Keep each name readable.
- Show one name in one position at a time.
- Do not repeat a name.
- Do not assign one person to several unrelated roles.
- Do not assign the same role to several people.
- Use Japanese lettering only as decorative texture.
- Do not add new Chinese text.
- Draw the outline first, then slide the name into the frame.
- Allow letters to appear sequentially or behind a temporary color mask.
- Hold briefly after the completed credit appears.
These instructions may improve the result, but they do not guarantee correct text. Check every title, name, and role manually. If an essential credit is incorrect, regenerate the affected output or correct it through an authorized editing workflow.
Step 4: Plan Transitions Between the Keyframes
This AI suspense movie intro relies on graphic transitions rather than soft cinematic dissolves.
Useful transition directions include:
- circular vinyl masks;
- vertical shutter cuts;
- long silhouette wipes;
- red-thread cuts;
- oversized-letter masks;
- split-screen reassembly;
- hard color-block changes;
- comic panels snapping into place;
- credit boxes drawing on before names appear.
Each transition should support the movement from one timed keyframe to the next.
For example, the circular vinyl shape can open into the train panels between 0 and 3 seconds. The train windows can become angled chase panels between 3 and 6 seconds. Red lines from the chase can extend into the evidence board between 6 and 9 seconds. Those same lines can expand into giant letterforms between 9 and 12 seconds.
Avoid soft dissolves, liquid morphs, romantic slow motion, and ordinary live-action scene transitions. They would weaken the hard-edged comic design established by the keyframes.
Step 5: Design the 15-Second Soundtrack
The visible source prompt requests an original soundtrack that is approximately:
- 60% suspense;
- 40% jazz.
Suggested musical elements include:
- sustained low tones;
- tense string staccatos;
- cold synthesizer pulses;
- sparse jazz-drum accents;
- brief walking-bass phrases;
- low saxophone or brass;
- a short muted-brass riff.
The requested audio progression is:
| Time | Audio direction | Visual connection |
|---|---|---|
| Opening | Two mysterious mechanical clicks | Vinyl record and thin lines appear |
| Around 3 seconds | Deeper low-frequency accent | Title and train keyframe |
| Around 6 seconds | Jazz rhythm enters | Pursuit keyframe |
| Around 10 seconds | Short muted-brass riff | Investigation shifts toward giant typography |
| Final 2 seconds | Tense, forceful ending accent | Ensemble keyframe and final credit |
Treat these as creative timing directions rather than guaranteed waveform-level controls.
Step 6: Use This MiniMax H3 Prompt
The prompt below combines:
- requirements visible in the partial source prompt;
- visual evidence from the six timed keyframes;
- transitions inferred from the finished video.
It is intended as a reproducible working template, not a transcript of the undisclosed original prompt.
Create a 15-second, 16:9 horizontal opening-title sequence for a light
suspense crime film.

Treat the six supplied images as ordered timeline keyframes, not as
interchangeable style references. They correspond to 0, 3, 6, 9, 12,
and 15 seconds.

At each specified time, move toward the subject arrangement, color
palette, panel structure, typography, and credit layout of the
corresponding keyframe. Generate coherent but energetic motion between
adjacent keyframes.

Do not rearrange the image order. Do not introduce a later keyframe as
the dominant composition too early. Do not mix all six keyframes into
every shot.

Maintain the shared visual language of the supplied images: a retro
Japanese animated title sequence, hard-edged character silhouettes,
comic-book collage, asymmetrical split screens, strong geometric color
blocks, outlined panels, printed grain, and paper texture.

Use a limited palette of deep navy, electric blue, purple, orange, and
crime-scene red. The atmosphere should be approximately 60% suspense
and 40% jazz: mysterious, cool, stylish, and urban rather than horror,
romance, or cheerful jazz.

0–3 SECONDS: KEYFRAME 1 TO KEYFRAME 2

Begin from black with thin pale lines drawing outward. Establish the
0-second composition: a large circular vinyl record with a detective
silhouette in its center, surrounded by night-street fragments, a
whiskey glass, a handwritten clue, dark windows, and compact credit
boxes.

Animate the vinyl and surrounding panels toward the 3-second keyframe.
Transform the circular and linear elements into horizontal train
panels. Arrive at the “MIDNIGHT LINE” title, night train, shadowed
character, ticket, illustrated eye, timer, orange interior, and framed
cast credits.

3–6 SECONDS: KEYFRAME 2 TO KEYFRAME 3

Move from the train and title panels into faster, angled comic frames.
Let train windows, title letters, and credit boxes cut apart and
reassemble.

At 6 seconds, arrive at the pursuit keyframe: a rainy blue city, shoes,
case file, illustrated character, communication device, and a running
silhouette on a rooftop or elevated city walkway. Use blue, purple,
orange, and red panels with crisp black borders.

6–9 SECONDS: KEYFRAME 3 TO KEYFRAME 4

Continue the pursuit while shifting from physical action to
investigation. Extend graphic red lines across the chase panels. Turn
documents and character portraits into evidence-board materials.

At 9 seconds, arrive at the investigation keyframe: a back-facing
investigator studying a wall of photographs, portraits, notes, sticky
labels, and connecting red thread. Include the photograph held by the
investigator and framed production credits.

9–12 SECONDS: KEYFRAME 4 TO KEYFRAME 5

Let the evidence-board lines expand, cut through the composition, and
rebuild the panels. Increase the frequency of hard cuts and color-block
changes.

At 12 seconds, arrive at the typographic keyframe: enormous condensed
blue and red English letterforms used as scenery, dividers, and masks.
Place character silhouettes, a bridge, city views, binocular imagery,
a watch, a case folder, and a partial face within narrow panels.

12–15 SECONDS: KEYFRAME 5 TO KEYFRAME 6

Transform the giant letters and city panels into a wider ensemble
composition. Keep the transitions crisp and synchronized with the
music.

At 15 seconds, arrive at the final keyframe: three character
silhouettes standing against a blue night city, surrounded by an
illustrated eye, a red photograph, industrial imagery, a mechanical
close-up, filmstrip perforations, and the final director credit. Hold
the completed composition briefly on the final musical accent.

MOTION AND TRANSITIONS

Use circular vinyl masks, vertical shutters, long character-silhouette
wipes, red-thread cuts, giant-letter masks, split-screen reassembly,
hard color-block cuts, and comic panels snapping into place.

Every transition should connect two adjacent keyframes and land on a
visual or musical beat. Keep the movement crisp, suspenseful, graphic,
and immersive.

Avoid soft dissolves, liquid morphing, romantic slow motion, gentle
transitions, and conventional realistic drama animation.

CREDIT TYPOGRAPHY

Use English for all essential credits. Use condensed uppercase
lettering inside thin outlined boxes.

Draw the frame first, then slide the name into it. Letters may appear
sequentially or be briefly concealed by a colored block. Hold the
completed credit long enough to be inspected.

Show each English name only once and in one location. Do not repeat a
name, duplicate a role, assign one person to several unrelated roles,
or assign the same role to several people.

Do not add new Chinese text. Sparse Japanese lettering may appear only
as decorative texture and must not replace essential English
information. Avoid malformed text and misspelled English.

AUDIO

Create an original 15-second soundtrack that is approximately 60%
suspense and 40% jazz.

Use sustained low tones, tense string staccatos, cold synthesizer
pulses, sparse jazz-drum accents, brief walking-bass phrases, low
saxophone or brass, and a short muted-brass riff.

Add two mysterious mechanical clicks near the opening. Add a deeper
low-frequency accent around 3 seconds. Let the jazz rhythm enter around
6 seconds. Introduce a short muted-brass riff around 10 seconds. Use a
tense, forceful ending accent during the final 2 seconds.

OVERALL CONSTRAINTS

Keep the result mysterious, cool, graphic, and crime-oriented.
Suspense must remain dominant; jazz should add style without making the
sequence cheerful.

Do not imitate the specific identity of an existing film or franchise.
Do not add brand logos, protected characters, or unauthorized assets.
Step 7: Generate the Video with MiniMax H3
Use the following workflow:
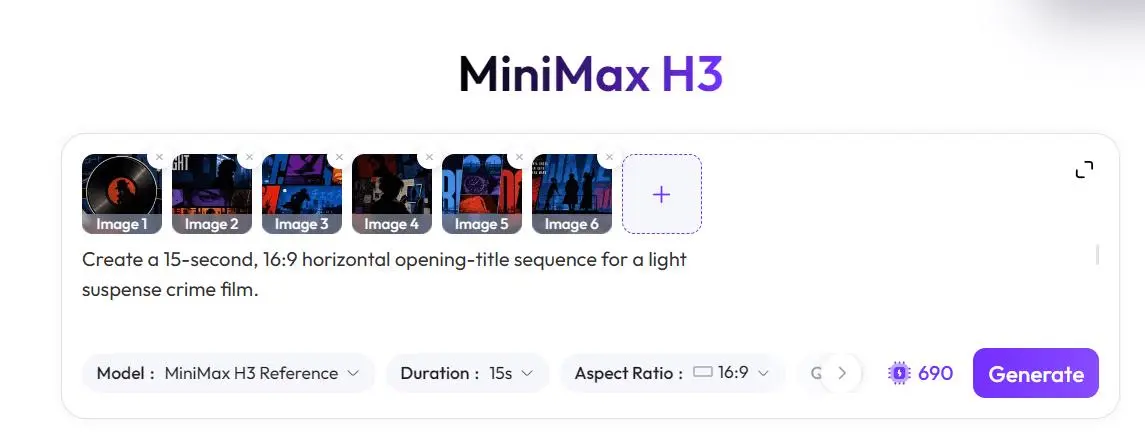
- Open MiniMax H3 on WeShop AI.
- Add the six keyframes in chronological order: 0, 3, 6, 9, 12, and 15 seconds.
- Paste the reconstructed prompt.
- If the current interface provides the relevant controls, select a 16:9 horizontal output and a 15-second duration.
- Confirm that the image order matches the prompt timeline.
- Generate the video.
- Play the full result and inspect its keyframes, transitions, credits, character consistency, and audio.
Step 8: Compare the Result with the Six Keyframes
0–3 Seconds: From Vinyl Motif to Title Reveal
The opening establishes the vinyl record and detective silhouette before expanding into the train, title, and cast-credit composition.
The transition preserves the central crime-jazz motif while introducing the story’s title.
3–6 Seconds: From Train to Pursuit
The horizontal train panels give way to sharper diagonal divisions, stronger purple and red blocks, investigative props, and a running silhouette.
This is where the sequence stops behaving like a static title card and begins to suggest action.
6–9 Seconds: From Pursuit to Investigation
The chase imagery transforms into an evidence board. Red graphic lines help connect the moving panels to the photographs and notes in the 9-second keyframe.
The result shifts the viewer’s attention from physical movement to the underlying mystery.
9–12 Seconds: From Evidence Board to Giant Typography
The evidence-board layout becomes more abstract and typographic. Blue and red letterforms grow to dominate the frame while character and city imagery remains visible inside the collage.
This creates the visual climax of the sequence.
12–15 Seconds: From Typography to Ensemble Ending
The oversized letters and narrow panels resolve into a wider three-character composition. The filmstrip motif and final director credit create a recognizable endpoint.
What to Check Before Publishing
Review the finished AI movie title sequence for:
- misspelled titles, names, or roles;
- duplicated credits;
- a role assigned to the wrong person;
- unstable character silhouettes;
- malformed decorative text;
- unintended logos or recognizable protected characters;
- flicker, broken panel edges, or abrupt transitions;
- distorted, clipped, or interrupted audio;
- reference assets without documented usage rights;
- missing AI-content disclosure.
Inspect essential text at full resolution. AI-generated credits can appear convincing in a preview while still containing incorrect letters.
If the final output is used commercially, confirm the rights to all six keyframes, the generated video, and any added music or post-production assets.
How to Adapt This Keyframe-to-Video Workflow
The same structure can be applied beyond fictional movie openings:
- product-launch teasers;
- anniversary videos;
- branded podcast intros;
- fashion collection previews;
- game-character introductions;
- suspense-led social ads;
- ecommerce campaign countdowns.
The individual crime motifs do not need to be copied. Instead, reuse the underlying structure:
- Start with one strong visual object.
- Introduce the title, product, or central character.
- Add movement, conflict, or a user problem.
- raise the visual intensity with typography and color;
- finish with an ensemble, product lineup, or brand composition.
Assign each keyframe a precise moment and purpose. Then use the prompt to describe the motion between those fixed visual milestones.
Final Takeaway
The strongest part of this AI suspense movie intro is not its quantity of plot. It is the controlled relationship between six keyframes.
The 0-second image establishes the motif. The 3-second image introduces the title and cast. The 6-second image begins the chase. The 9-second image reveals the investigation. The 12-second image delivers the typographic climax. The 15-second image closes on the ensemble.
The prompt then defines how MiniMax H3 should travel between those points through masks, red-line cuts, panel reassembly, typography, and synchronized music.
If you already have a set of storyboard frames, try arranging them as timed milestones in MiniMax H3 on WeShop AI. Define the role of each frame, describe the transitions between adjacent images, and review the resulting credits, motion, audio, rights, and AI disclosure before publishing.