






Top 10 Prompts for Photo Editing That Actually Work
Test 10 copy-ready photo editing prompts across portraits, product images, and street scenes. See what worked, what partially failed, and how to preserve faces, materials, lighting, and composition with GPT Image 2.
Top 10 Prompts for Photo Editing That Actually Work
The top 10 prompts for photo editing below solve a frustrating problem: an AI editor may understand what you want changed, yet also alter the face, product shape, lighting, or composition you wanted to keep. A useful prompt therefore needs two jobs. It must describe the edit clearly and protect everything outside that edit.
We tested that approach on three very different source images: a fashion portrait, a handbag packshot, and a busy street. The results cover background replacement, recoloring, hairstyle changes, relighting, object removal, reference-guided editing, seasonal changes, and canvas expansion. One test also missed part of the instruction, which reveals when a dedicated editing tool works better than prompt text alone.
Why Generic Photo Editing Prompts Fail
“Make this look better” gives an image model too much freedom. Even a more specific request such as “change the background” may cause subtle changes to the subject because it never says what must remain untouched.
The strongest AI photo editing prompts use five pieces of information:
- The main edit.
- The elements that must stay unchanged.
- Lighting, shadow, texture, or perspective rules.
- Details the model must not add.
- The required output ratio or composition.
That structure turns the top 10 prompts for photo editing into reusable instructions rather than one-line style suggestions.
Three Images, Ten Controlled Tests
Each edit below starts from the original source image, not from a previous result. This matters because chained edits make it impossible to tell which prompt caused a face, material, or background to drift.
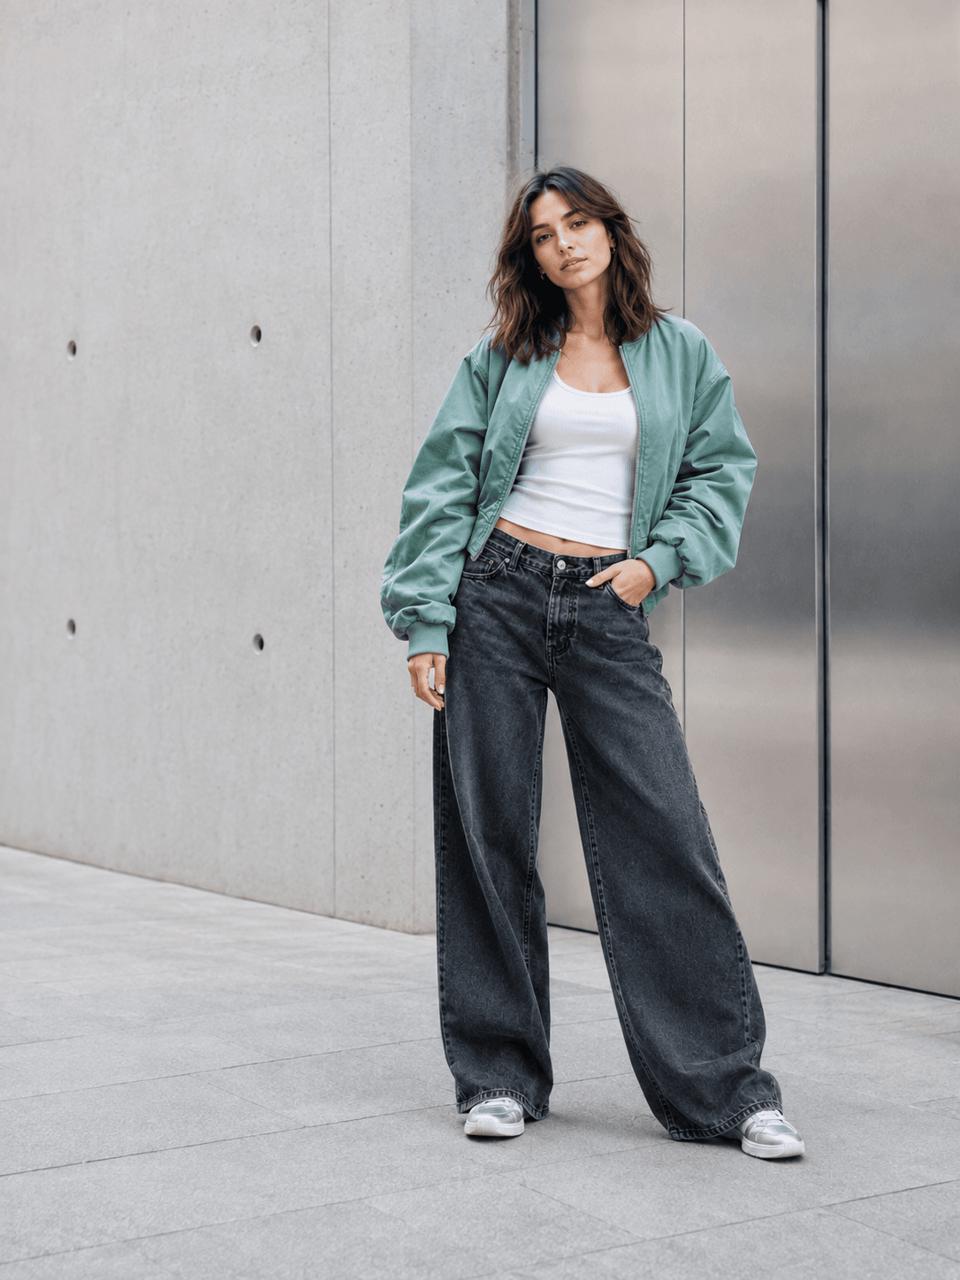
Used for background, clothing color, hair, and lighting tests.
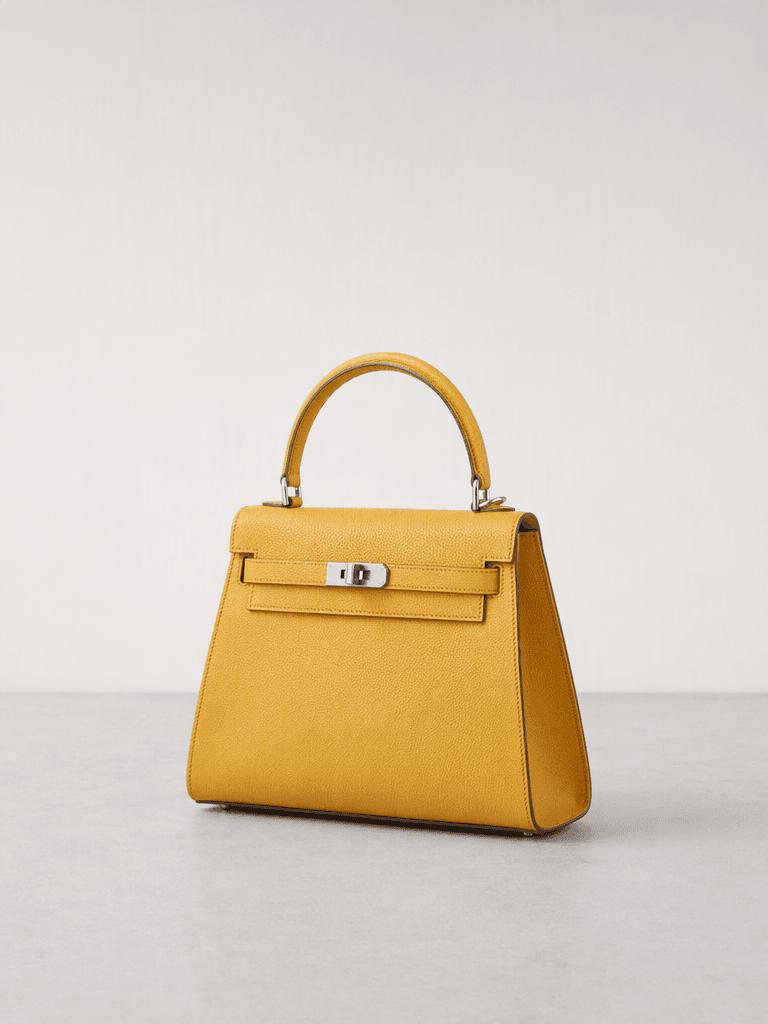
Used for scene, colorway, layout, and accessory tests.
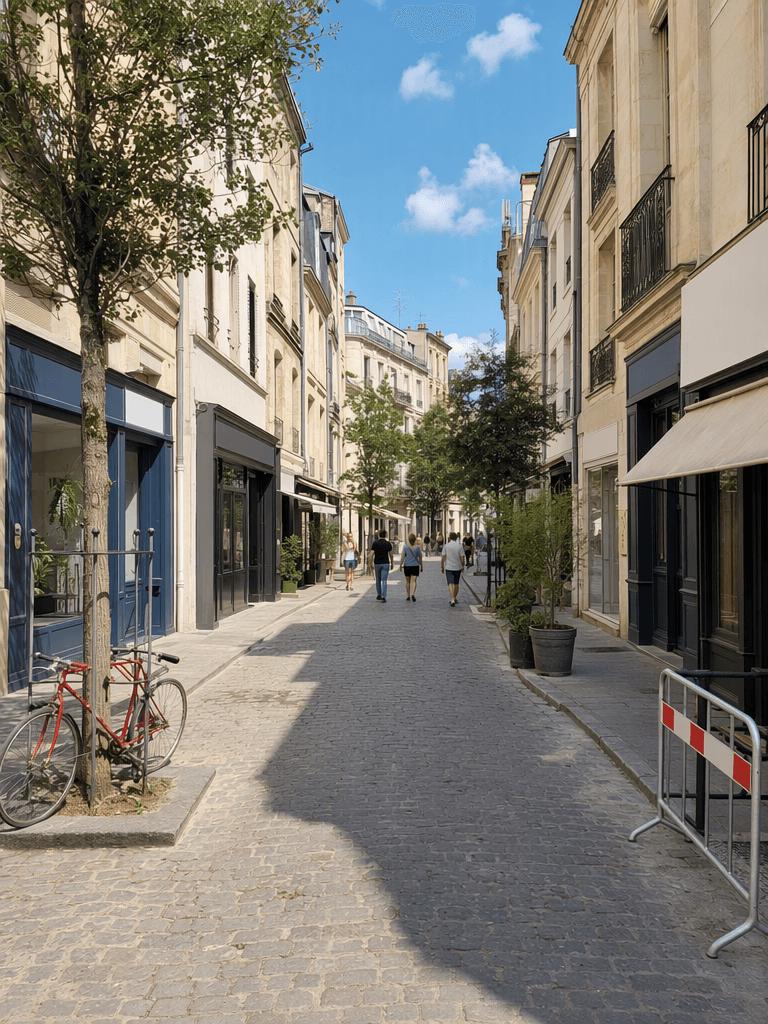
Used for object removal and seasonal transformation.
For a fair comparison, keep the same image model and quality setting throughout the test. Keep the original 3:4 ratio unless the prompt specifically requests another format.
Top 10 Prompts for Photo Editing on Portraits
The portrait tests focus on identity preservation. The model, pose, white tank, dark jeans, shoes, and body proportions should remain stable while one visible property changes.
1. Replace a Portrait Background
Use this prompt when the subject is already usable but the location does not fit the campaign.
Edit the uploaded photograph. Replace only the concrete-and-metal city background with a bright Mediterranean seaside promenade featuring pale limestone paving, turquoise water, a distant rocky coastline, and a clear summer sky. Match the original camera height, perspective, coastal daylight, and contact shadow beneath the shoes. Preserve the woman’s exact face, expression, hair, pose, body proportions, sea-green bomber jacket, white tank, charcoal jeans, silver shoes, and complete anatomy. Keep the 3:4 framing. Do not add people, bags, text, logos, or palm trees.
The result creates a clear coastal location while retaining the outfit and standing pose. Check the hair outline and the shadow beneath the shoes first, because those edges reveal whether the new background has been integrated rather than simply placed behind the subject.
2. Recolor One Garment Without Changing Its Material
Edit only the bomber jacket. Change it from sea green to a rich, medium-saturation cherry red. Preserve the original technical fabric, sheen, stitching, zipper, ribbed cuffs, elastic waistband, seams, folds, highlights, and shadows. Keep the face, skin, brown hair, white tank, charcoal jeans, silver shoes, hands, background, lighting, camera angle, and 3:4 composition unchanged. Do not recolor nearby skin, hair, or clothing, and do not turn the jacket into leather or add logos.
This is a useful prompt for colorway previews because it defines both the target color and the material behavior. The result changes the jacket strongly without turning the fabric into a flat red overlay.
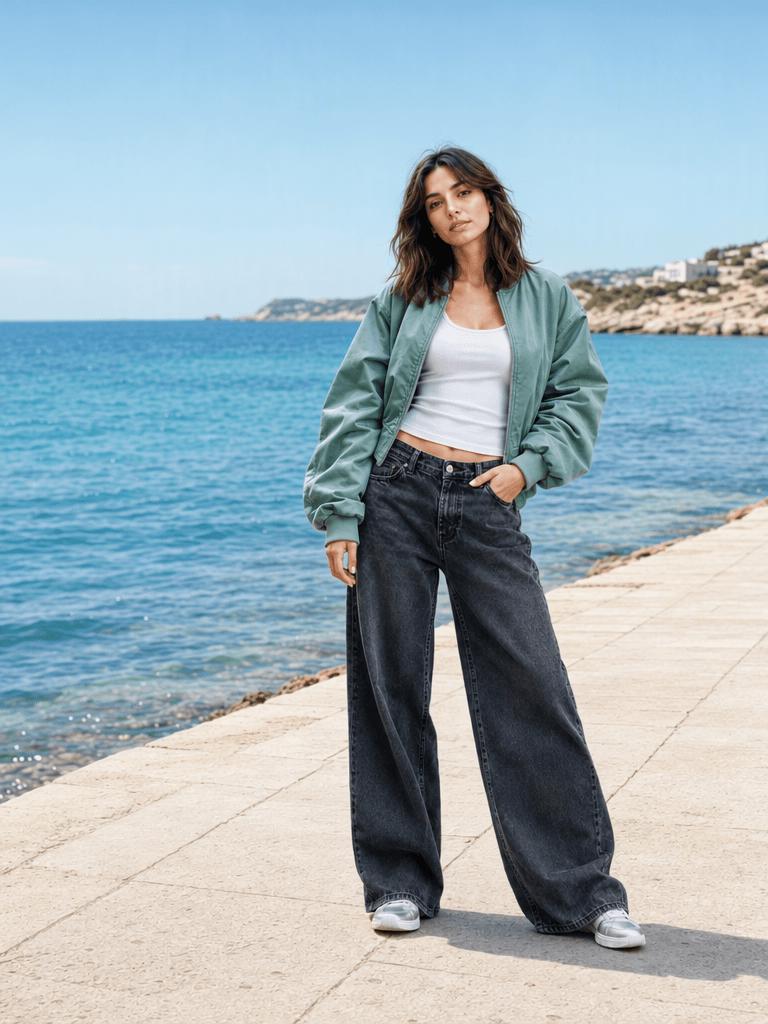
Changed: city wall → Mediterranean coast.
Preserved: identity, pose, outfit, and 3:4 framing.
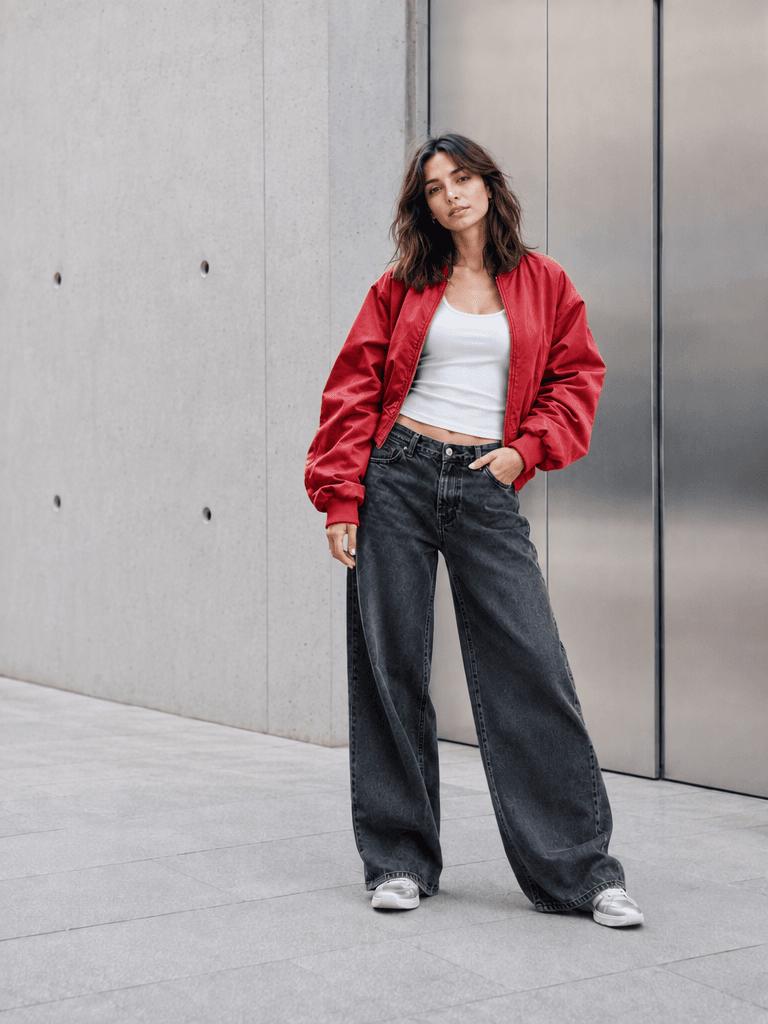
Changed: sea-green jacket → cherry red.
Preserved: fabric sheen, folds, face, and background.
3. Change the Hairstyle and Hair Color
Edit only the woman’s hair. Replace the shoulder-length wavy dark-brown style with a sleek chin-length copper bob with a precise center part and softly curved ends. Add realistic strands, roots, volume, and subtle flyaways. Preserve her exact facial identity, expression, skin texture, ears, neck, body, pose, clothing, background, lighting, and 3:4 framing. Do not change her makeup, age, face shape, eyebrows, or outfit.
The output produces a shorter warm-toned bob while keeping the streetwear styling. Hair edits are identity-sensitive, so compare the eyes, jawline, and mouth with the source instead of checking the haircut alone.
4. Turn Flat Daylight Into a Fashion Lighting Setup
Relight the entire photograph as a blue-hour direct-flash fashion editorial. Keep the same woman, outfit, pose, architecture, pavement, camera position, and composition. Shift the ambient environment toward clean cool-blue light, then illuminate the woman with controlled direct flash, crisp facial highlights, natural eye catchlights, and a defined shadow on the wall. Maintain accurate skin tone and the original clothing colors. Keep the image bright and editorial. Do not add rain, neon, people, text, or a different background.
The result creates a much stronger directional shadow and a saturated blue environment. It reads as a bold editorial relight, although the wall becomes more intensely blue than a restrained natural blue-hour photograph. That is a useful reminder to review global color shifts after relighting.
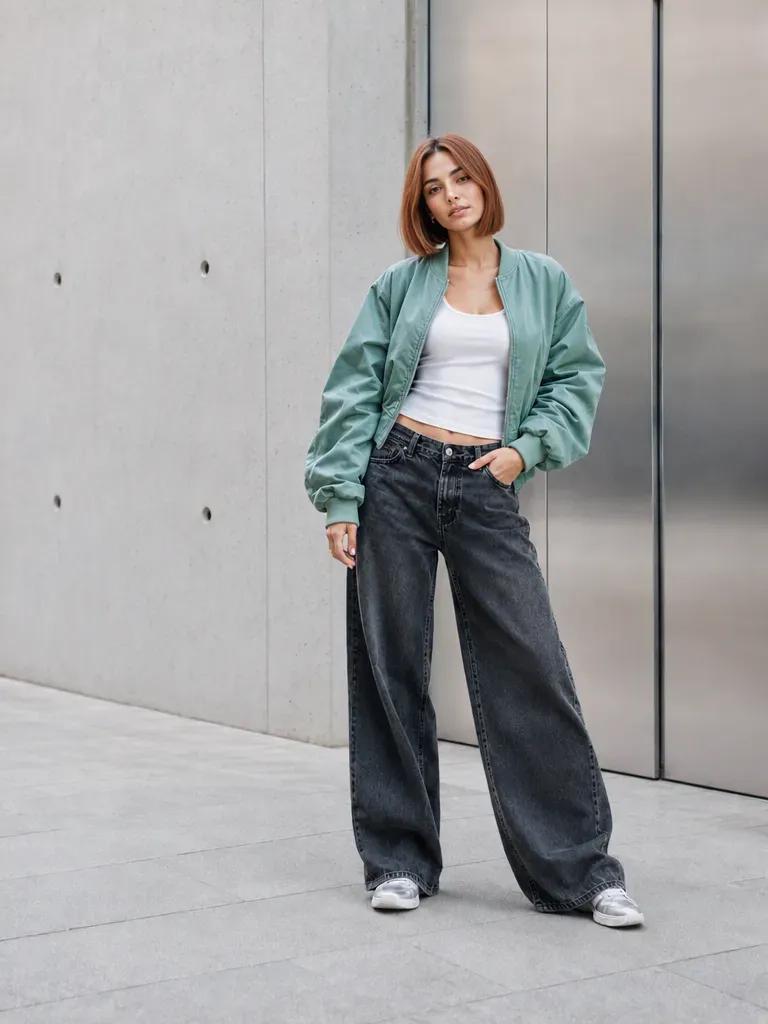
Changed: long dark waves → copper bob.
Review: eyes, jawline, mouth, and hair edges.
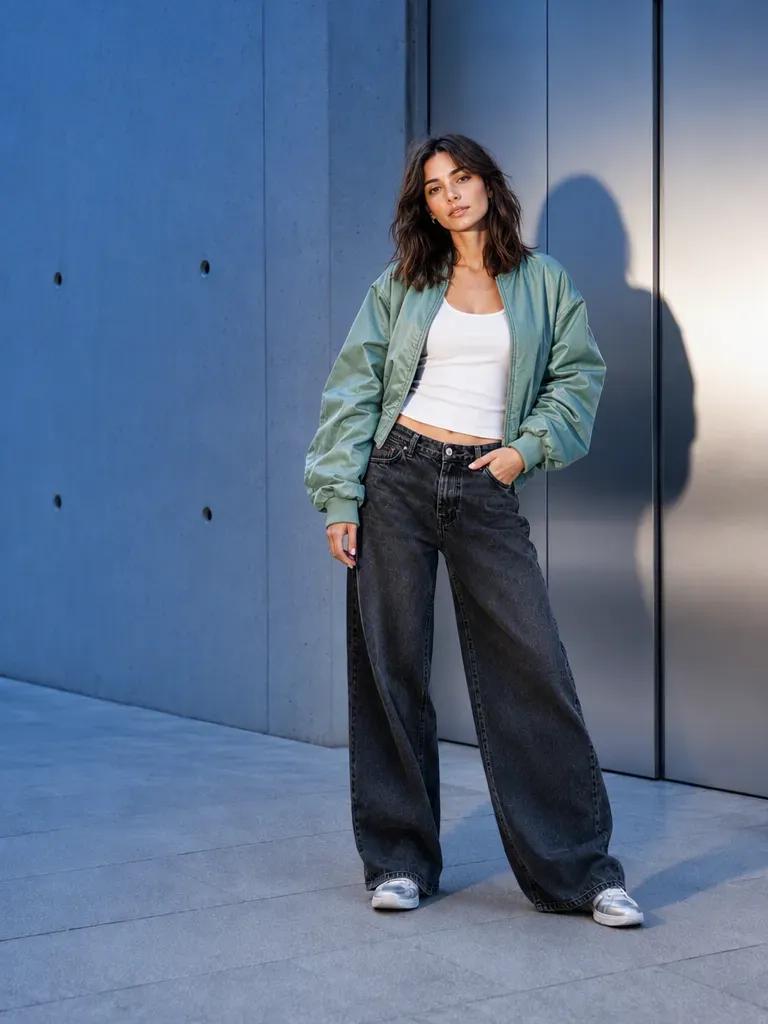
Changed: flat daylight → blue direct-flash look.
Result note: visually strong, but bluer than natural blue hour.
Top 10 Prompts for Photo Editing on Product Photos
Product edits have a stricter rule than casual creative edits: the item must still be the same sellable product. Shape, hardware, stitching, material grain, and proportions matter as much as the visual concept.
5. Replace a Plain Product Background
Replace the gray studio wall and tabletop with a bright summer poolside campaign setting. Place the existing handbag on a pale-blue tiled pedestal beside clean turquoise water with minimal white architecture behind it. Use crisp midday sunlight, restrained water reflections, and a realistic contact shadow. Preserve the handbag’s mustard-yellow leather, trapezoid silhouette, handle, flap, silver clasp, side panel, stitching, grain, proportions, and three-quarter angle. Keep the 3:4 composition. Do not add people, drinks, plants, text, logos, or another bag.
The poolside result changes the commercial context while keeping the bag recognizable. Review the handle connections, clasp, side panel, and leather texture before using a generated lifestyle image on a PDP or campaign page.
6. Create a New Product Colorway
Edit only the leather color of the handbag. Change every mustard-yellow leather section to deep oxblood red with a refined medium-gloss finish. Preserve the fine leather grain, stitching, panel construction, edge paint, folds, highlights, and natural tonal variation. Keep the clasp and all hardware silver. Preserve the silhouette, handle, perspective, position, background, contact shadow, lighting, and 3:4 composition. Do not change the design, material, size, hardware shape, or background.
This edit succeeds because the prompt excludes the silver hardware and describes how the new color should behave across highlights and shaded side panels.
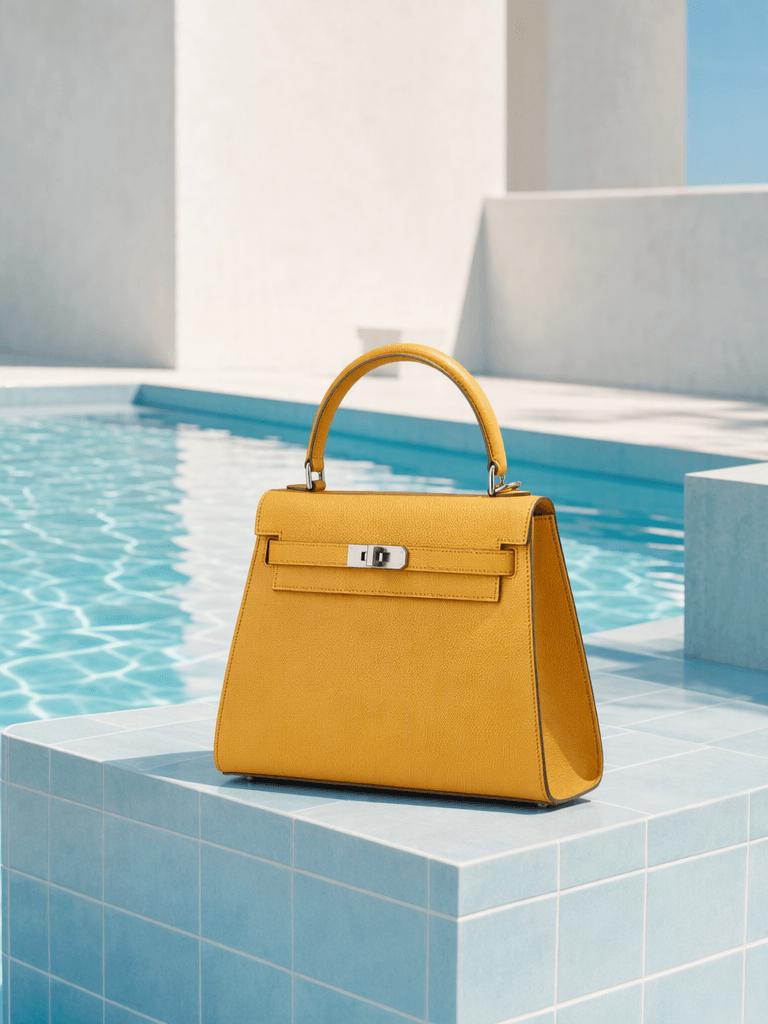
Changed: gray studio → bright poolside campaign.
Preserved: bag shape, yellow leather, clasp, and angle.
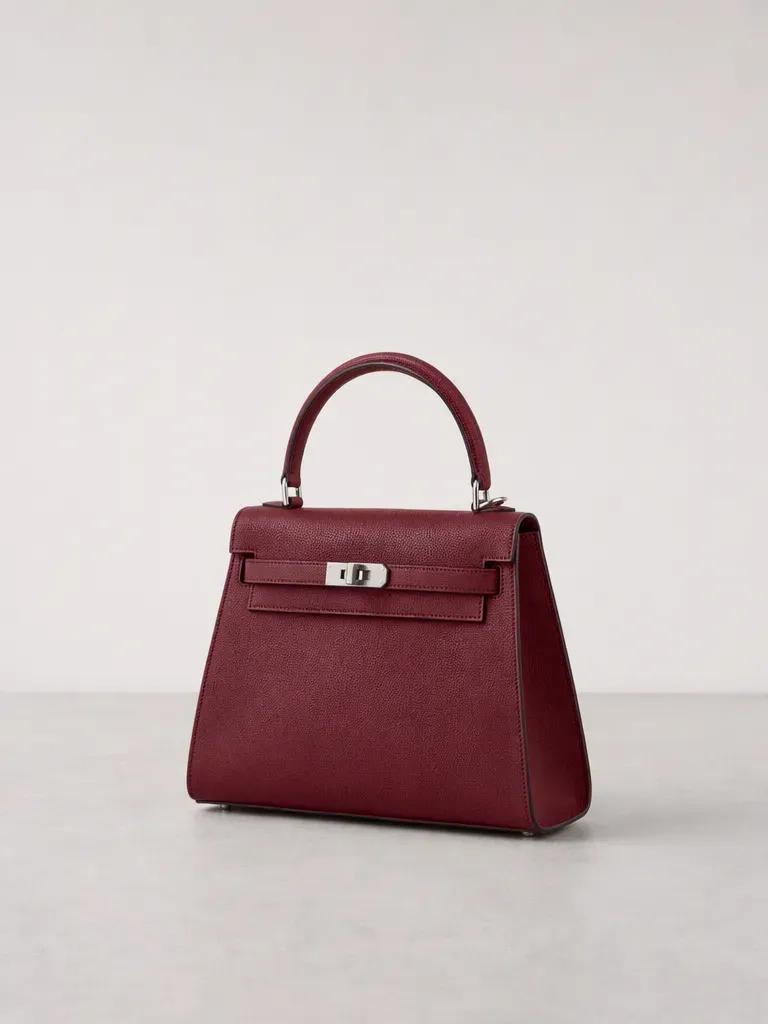
Changed: mustard leather → oxblood red.
Preserved: silver hardware, grain, stitching, and shadow.
7. Move a Product and Create Advertising Space
Recompose the uploaded 3:4 product photograph as a clean 16:9 horizontal ecommerce advertising image. Move the complete handbag to the right third while keeping the same scale, viewing angle, and upright orientation. Extend the pale-gray wall and tabletop across the left to create uninterrupted copy space. Preserve the bag’s leather color, handle, flap, clasp, depth, stitching, grain, proportions, and contact shadow. Do not add text, props, graphics, borders, logos, or gradients.
This was the only partial miss in the test. The bag moved to the right and the left side gained useful negative space, but the file remained a 3:4 vertical image rather than becoming 16:9. When the canvas ratio is a hard requirement, set the output ratio directly or use Expand Image after the object placement is correct.
8. Add an Accessory From a Second Reference Image
Upload the handbag first and the scarf second. Image order matters because the editor needs to know which asset is the base and which is the reference.
Use Image 1 as the main product photograph and Image 2 only as the accessory reference. Fold the scarf from Image 2 into a narrow band and tie it in one neat knot around the left base of the handbag’s top handle. Let two short ends drape naturally without covering the clasp or flap. Preserve the scarf’s navy, white, orange, and pale-blue wave pattern, border, sheen, and texture. Keep the handbag, lighting, background, position, and 3:4 composition unchanged. Do not redesign the scarf, recolor the bag, replace the handle, or add a second accessory.
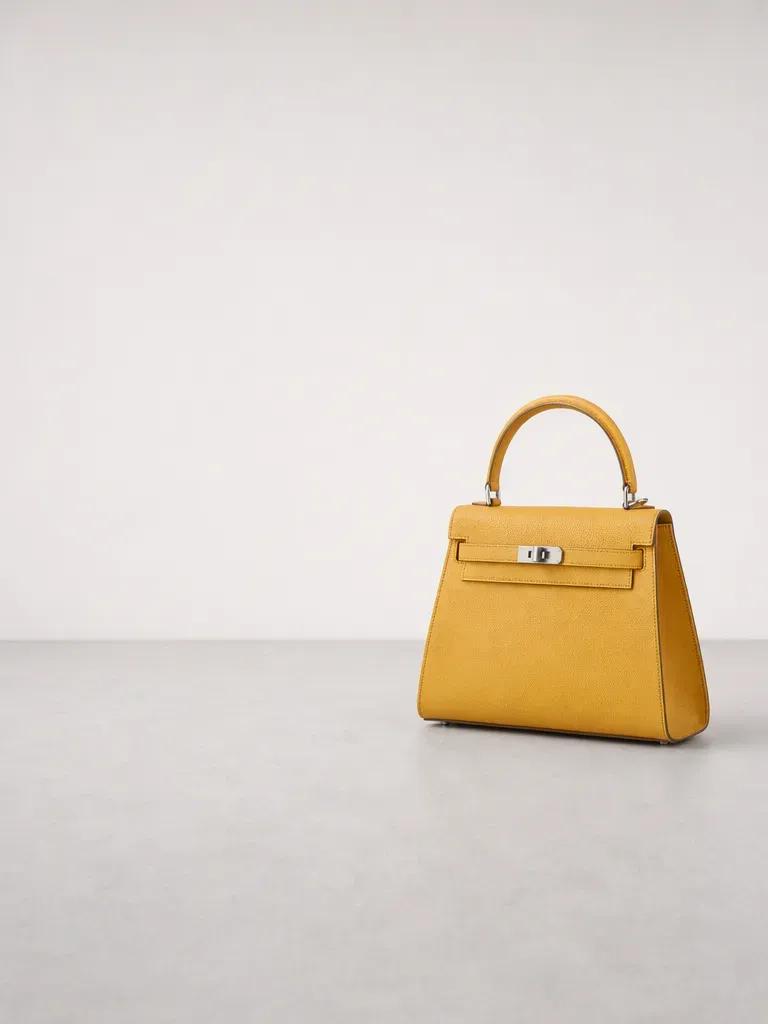
Bag moved right and copy space appeared, but the output stayed 3:4 instead of 16:9.
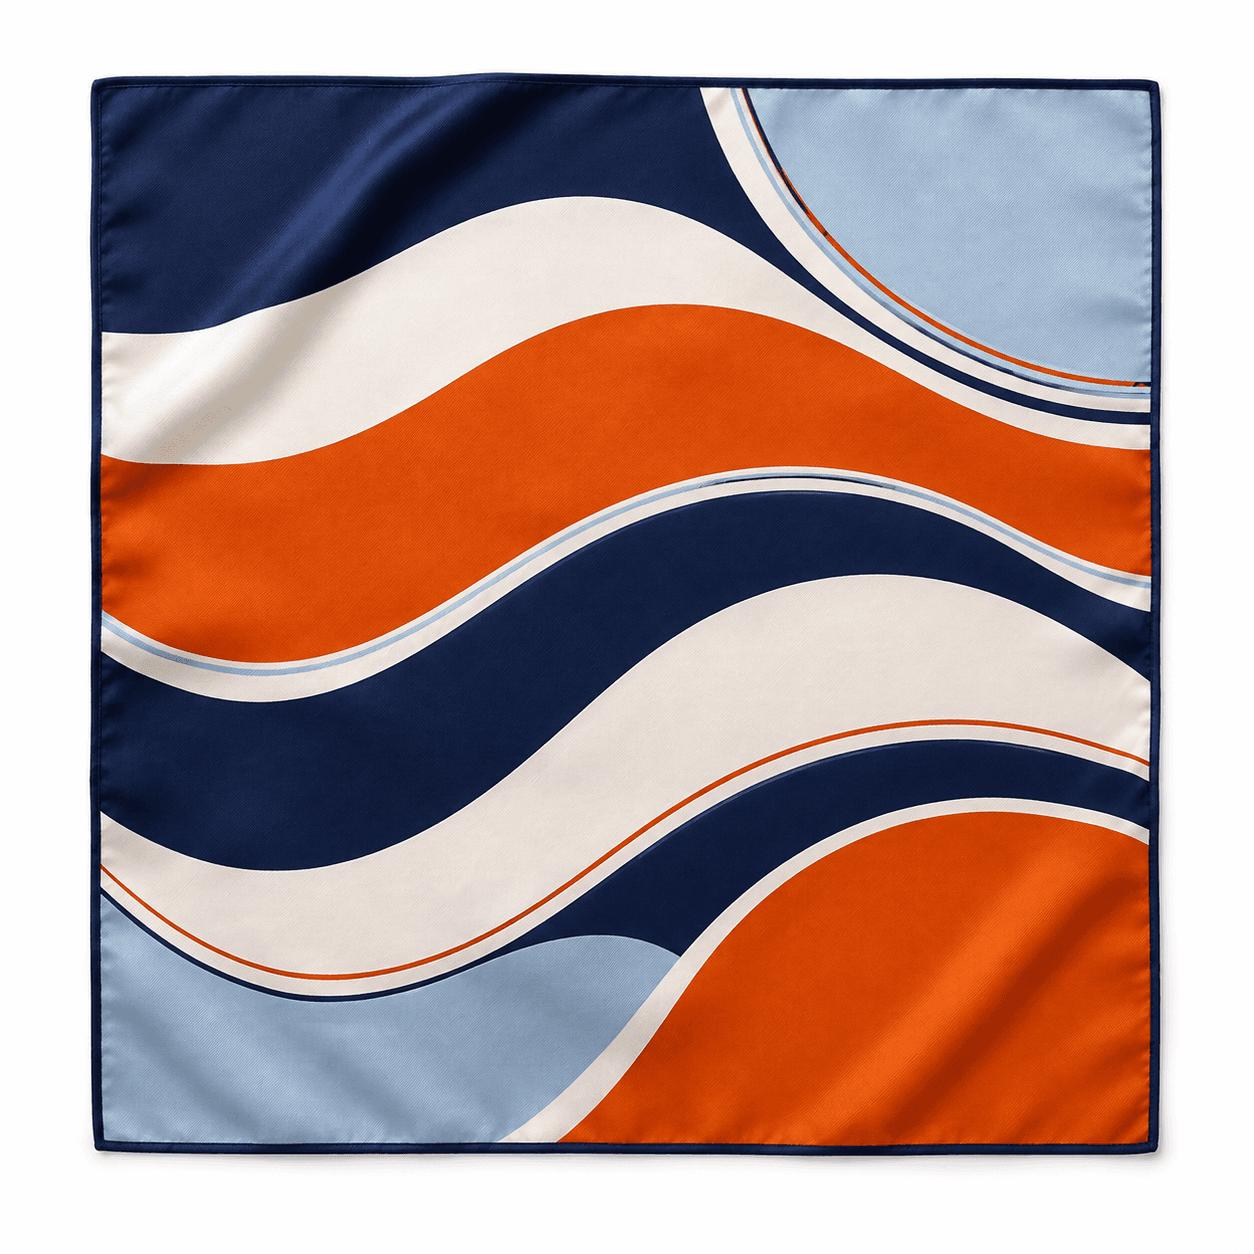
The second upload supplies the palette, wave pattern, border, and fabric sheen.
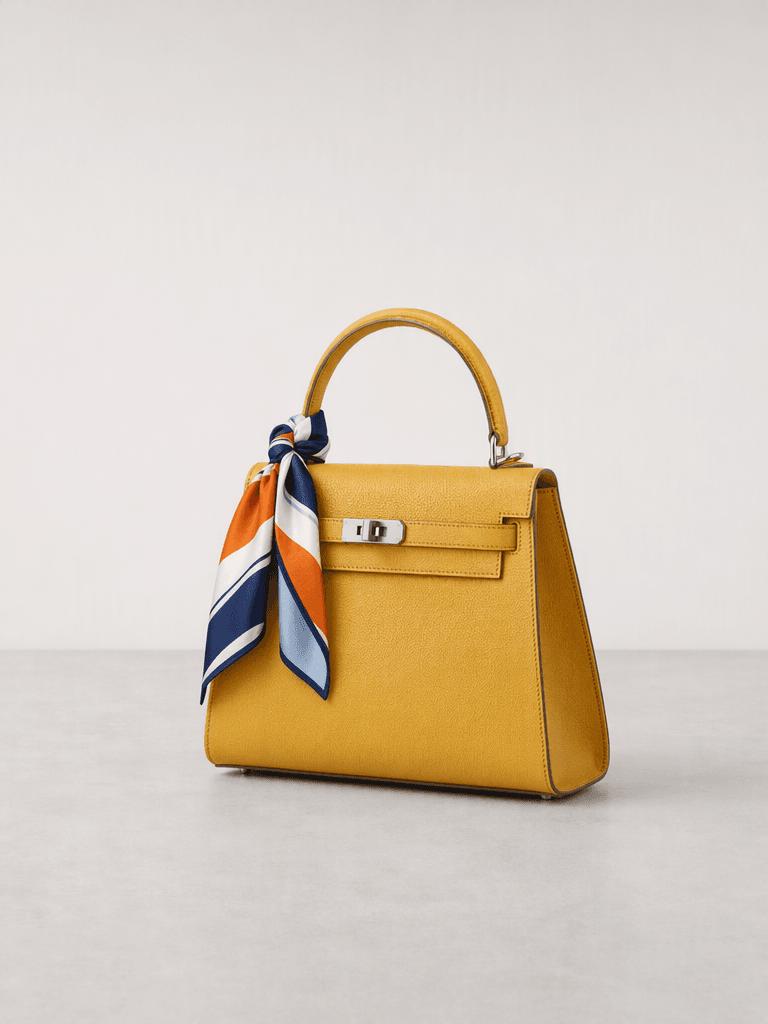
Scarf added to the handle with recognizable color, pattern, folds, and physical contact.
The scarf keeps its recognizable palette and wave pattern while wrapping around the handle with believable folds and overlap. For reference-guided edits, check pattern fidelity, scale, physical contact, and whether the base product was unnecessarily redesigned.
Top 10 Prompts for Photo Editing on Street Photos
Street scenes test a different skill: reconstructing information that was hidden behind people or objects while preserving architecture and perspective.
9. Remove People and Temporary Objects
Remove every pedestrian from the middle and far distance, remove the red bicycle leaning against the tree on the left, and remove the red-and-white road barrier on the right. Reconstruct the hidden cobblestones, storefront edges, tree trunk, sidewalk, railing, and distant street. Preserve the buildings, windows, balconies, awnings, trees, potted plants, sky, sunlight, shadows, camera position, perspective, and 3:4 framing. Do not change the weather, season, architecture, road width, storefront colors, or camera angle. Avoid ghost figures, repeated paving, and blurred patches.
The cleared result removes the targeted distractions and reconstructs an empty street with continuous paving and storefronts. Inspect the former bicycle and barrier areas at full size; those overlapping edges are where removal artifacts usually appear.
10. Change Summer Into a Winter Snow Scene
Transform the sunny summer street into a realistic winter scene during fresh light snowfall. Keep the exact street, buildings, windows, balconies, storefronts, awnings, road width, camera position, perspective, pedestrians, bicycle, and barrier. Make the trees mostly bare, add believable snow to branches, rooftops, rails, ledges, awnings, and street edges, and retain some visible cobblestone beneath thin snow and slush. Adapt the pedestrians’ clothing into winter coats while keeping their positions. Use cool diffuse daylight. Do not add Christmas decorations, vehicles, mountains, or fantasy lighting.
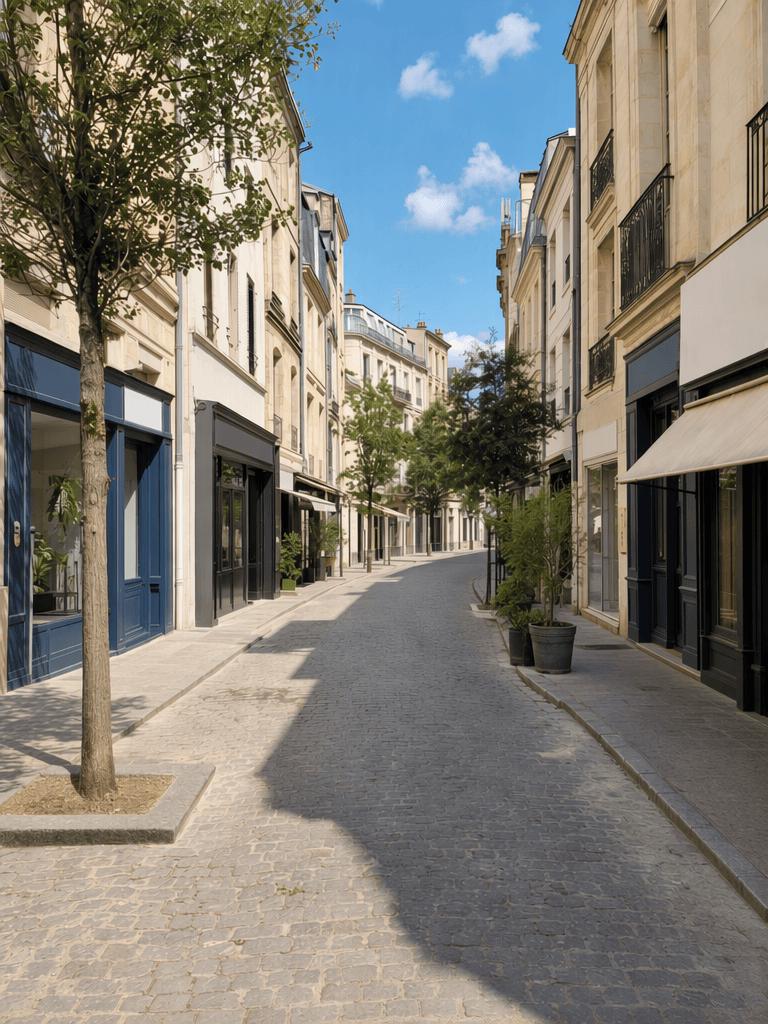
Removed: pedestrians, bicycle, and barrier.
Rebuilt: cobblestones, sidewalk, storefront edges, and distance.
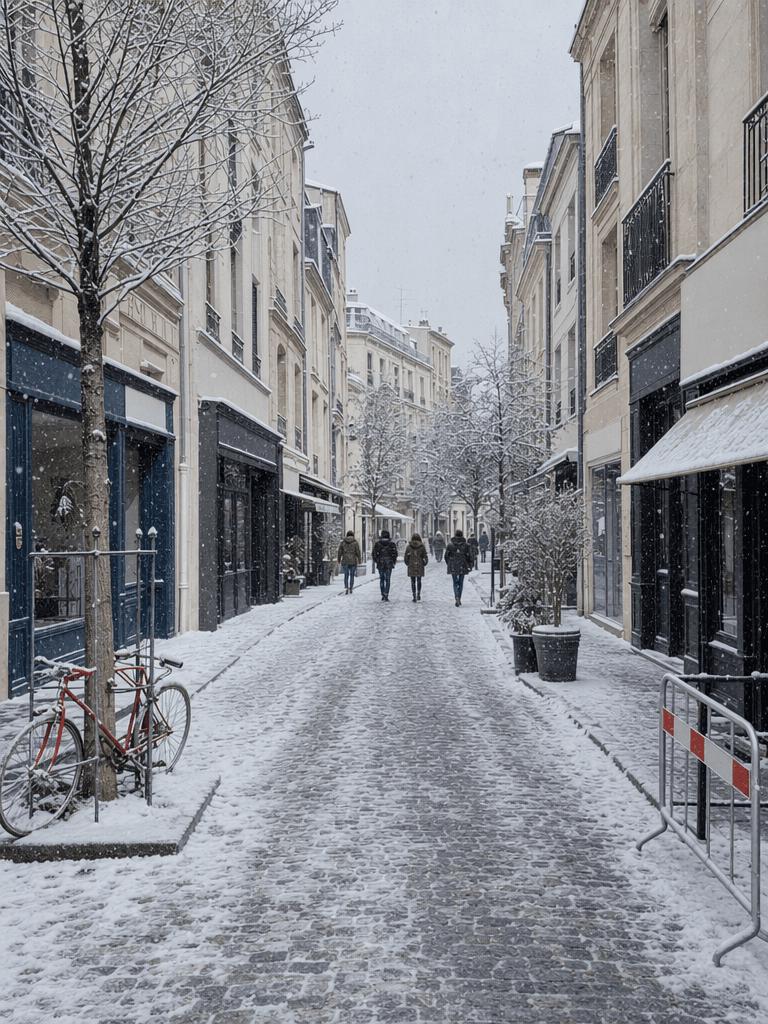
Changed together: snow, trees, sky, light, and clothing.
Preserved: architecture, camera position, and street geometry.
The winter result keeps the main street layout while changing foliage, clothing, sky, and snow coverage together. That dependency matters: changing only the weather while leaving green summer trees and light clothing would make the scene inconsistent.
How to Use the Top 10 Prompts for Photo Editing
- Upload the cleanest available original. Avoid compressed screenshots when a full-resolution source exists.
- Paste one prompt without combining it with another test. A background change and a hairstyle change should be separate generations.
- Start each test from the original image. Do not build a ten-step chain unless cumulative editing is the goal.
- For a two-image edit, upload the base image first and the reference second, then define each image’s role in the prompt.
- Review the first result at full size. Check faces, hands, hair edges, product hardware, stitching, shadows, paving, windows, and repeated textures.
- If the edit is correct but the format is wrong, keep the result and fix the canvas separately instead of regenerating the subject.
How the Top 10 Prompts for Photo Editing Protect the Original
The most reusable prompt formula is:
Primary edit + exact target + preserve list + physical integration rules + exclusions + output format
For example, “make the bag red” identifies only a color. The tested version also protects the leather grain, stitching, silver hardware, shape, lighting, shadow, and background. That extra preservation language is what makes the result more useful for commercial work.
Match the Editing Method to the Job
General prompt-based editing is useful when several connected parts of the image must change together, such as moving a portrait to the coast or turning summer into winter. Narrow jobs may be faster with a dedicated tool:
- Use Product Recoloring when only a product color should change.
- Use Relight when the composition is correct and only the lighting needs adjustment.
- Use Magic Eraser when unwanted objects can be selected precisely.
- Use Expand Image when a required canvas ratio or safe area must be enforced.
- Use Design Repair when one region needs to be corrected from a target reference.
The seventh test shows why this distinction matters. The prompt understood the desired placement but did not obey the requested 16:9 canvas. A dedicated expansion step gives the ratio change its own controlled operation.
Turn the Top 10 Prompts for Photo Editing Into Usable Assets
These edits can support more than visual experiments. A fashion team can reuse one model photo across color stories and locations. An ecommerce seller can build color variants, seasonal product scenes, and banner compositions from one packshot. A social team can remove distractions or adapt a street image for another season without recreating the full scene.
Start with one of the top 10 prompts for photo editing, keep the preserve list specific, and judge the result by fidelity as well as appearance. Upload a source image in WeShop AI, paste the prompt that matches your task, and create a controlled before-and-after you can actually review, revise, and publish.