








Seedream 5.0 Pro AI Image Generator: Select and Edit Multiple Regions
Learn how to use Seedream 5.0 Pro to select multiple image regions, add independent objects, and preserve the original scene’s structure, lighting, and perspective.
Seedream 5.0 Pro AI Image Generator: Select and Edit Multiple Regions
The most common problem with AI image editing is not a failure to generate content. It is the model changing parts of the image that were supposed to remain untouched.
You may only want to add a cat to the right side of a room, but the furniture moves. You may request a ball of yarn on the floor, only to find that the walls, lighting, and image proportions have also changed.
A more controlled method is to select the areas that need editing and then describe what should appear inside each region.
This tutorial uses the Seedream 5.0 Pro AI Image Editor to add a giant blue cat, transparent bubble, yarn ball, abstract blocks, and green blanket to separate regions of the same interior image.
Original Image and Generated Result
| Original Image with Selected Regions | Seedream 5.0 Pro Editing Result |
|---|---|
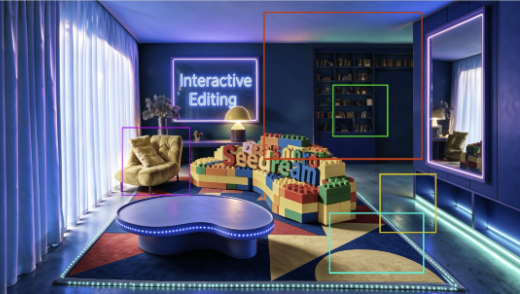 | 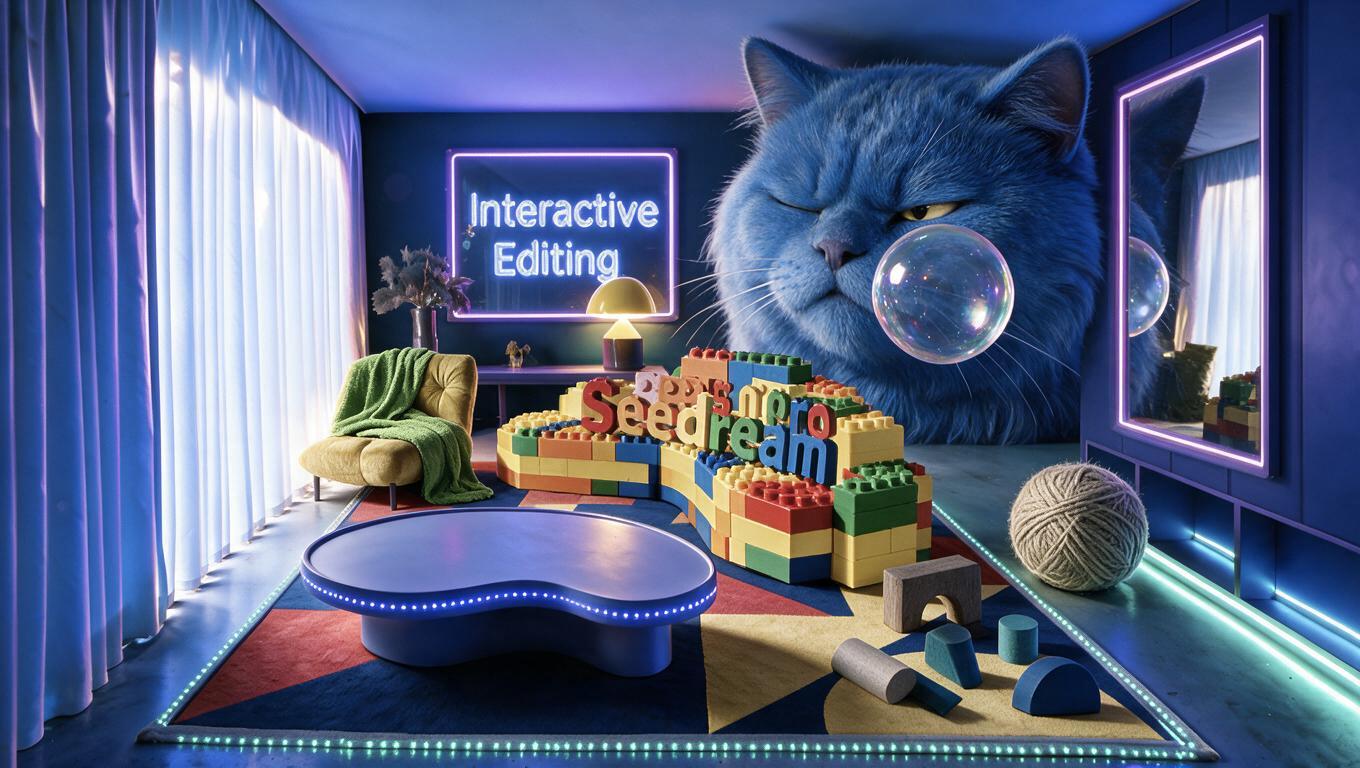 |
| Colored boxes mark the areas that need to be edited. | The AI adds an independent object to each region while preserving the room’s overall structure and lighting. |
This task does not ask the AI image editor to redesign the entire room. Each new element should follow the position established by its selected region.
The selection tells the model where to edit. The text instruction tells it what to generate.
Step 1: Upload the Original Image
Open the WeShop Seedream 5.0 Pro AI Image Editor and upload the image you want to modify.
The original image in this example is a blue-and-purple neon interior containing:
- Floor-to-ceiling curtains
- An armchair
- An organically shaped coffee table
- A geometric rug
- A colorful block installation
- An illuminated wall sign
- A bookshelf and mirror
These elements establish the room’s existing structure. The goal is to add new objects in specific locations without redesigning the entire scene.
Add a preservation instruction before describing the selected regions:
Keep the room structure, furniture positions, image proportions, camera angle, perspective, and blue-purple lighting unchanged.
This helps the AI image editor distinguish between content that should be preserved and areas that may be modified.
Step 2: Select the Areas You Want to Edit
Enter the image-editing interface and choose the rectangular selection tool. Draw a box around every area where an object should be added or replaced.
Operation screenshot placeholder: Insert the public URL for the Seedream 5.0 Pro interface screenshot showing the rectangle selection tool and multiple selected regions.
In this example, different boxes define five independent editing areas:
| Region | Position | Requested Edit |
|---|---|---|
| Red box | Right wall and the area in front of the bookshelf | A giant blue long-haired cat head |
| Green box | In front of the cat’s face | A transparent bubble |
| Yellow box | Floor on the right side | A warm gray-beige yarn ball |
| Cyan box | Lower-right area of the rug | A group of abstract blocks |
| Purple box | Armchair on the left | A grass-green blanket |
When creating selections:
- Cover the main space the new object should occupy.
- Avoid unnecessary overlap between different selections.
- Use a larger region for a larger object.
- Place the selection according to the room’s existing perspective.
- Extend the region to the floor when the new object needs physical ground contact.
The cat is the main addition, so its selection covers a large section of the wall. The bubble occupies less space and therefore uses a smaller region in front of the cat’s face.
This regional editing method can also support AI generative fill, ecommerce product editing, furniture replacement, object insertion, and AI photo restoration.
Step 3: Describe Each Selected Region
After creating the selections, describe what the AI should generate in each area.
Use the following structured regional editing prompt:
Edit the corresponding areas according to the differently colored boxes marked in the image.

Keep the room’s original composition, furniture positions, camera angle, perspective, blue-purple neon lighting, and all unselected areas unchanged.

Red box:
Generate a giant blue long-haired cat head. Make the cat look as though it has been squeezed into the room, with its body remaining outside the frame and only its oversized head visible.

Give the cat a slightly annoyed expression, with one eye partly closed as it watches the transparent bubble in front of its face. Its fur should be dense and soft, reflecting the blue and purple lighting in the room.

Green box:
Generate a transparent bubble in front of the blue cat’s face. Its surface should reflect the blue, purple, and warm yellow lights in the room, with realistic transparency, highlights, and subtle rainbow reflections.

Yellow box:
Generate a large warm gray-beige ball of yarn naturally resting on the floor on the right side of the room. Show clear wrapped-yarn structure, soft fiber texture, and a realistic contact shadow consistent with the floor lighting.

Cyan box:
Generate a group of scattered abstract building blocks. Include a warm dark-gray arch, a warm light-gray half cylinder, a lake-blue cylinder, a dark lake-blue slope, and a cobalt-blue semicircular block.

Arrange the blocks naturally on the rug. Their scale, perspective, and shadows must match the room.

Purple box:
Add a grass-green blanket to the armchair on the left. Let it drape naturally across the backrest, arm, and seat, with realistic woven texture, soft folds, and natural hanging fabric.

All generated elements must remain inside their corresponding selected regions and stay visually independent. Do not let one object incorrectly cover another region.

Match the perspective, lighting direction, shadow intensity, and blue-purple neon color palette of all new objects to the original image.

Do not modify unselected areas. Do not move the existing furniture, change the room structure, alter the aspect ratio, or generate extra animals, objects, text, or watermarks.
The same prompt structure can be reused for other regional editing tasks:
Content to preserve:
[Describe the composition, subject, product, background, and lighting that must remain unchanged.]

Region 1:
[Enter the location or annotation label.]
[Describe the content to add, replace, or remove.]

Region 2:
[Enter the location or annotation label.]
[Describe the content to add, replace, or remove.]

Consistency requirements:
[Describe the required lighting, perspective, shadows, materials, and visual style.]

Do not change:
[List the elements and areas that must remain untouched.]
This structure can be adapted to:
- Change the color or design of selected clothing
- Replace a label on product packaging
- Swap furniture inside a selected area
- Add decorations to an empty region
- Modify one part of a background
- Repair a selected product defect
Step 4: Generate the Regional Editing Result
After creating the selections and completing the descriptions, choose Seedream 5.0 Pro and generate the edited image.
The AI processes each selected region according to its corresponding instruction while attempting to preserve the original content outside those areas.
The result in this example includes:
- A giant blue long-haired cat on the right side of the room
- A reflective transparent bubble in front of the cat
- A warm gray-beige ball of yarn on the floor
- A group of blue and gray abstract blocks on the rug
- A grass-green blanket draped over the armchair
- The original curtains, table, wall sign, block installation, and room structure
The quality of regional editing depends on three main factors:
-
Selection accuracy
The selected region influences the location and approximate size of the generated object. -
Description specificity
In addition to naming the object, describe its color, material, position, pose, and orientation. -
Scene consistency
New objects should follow the perspective, lighting direction, shadows, and color palette of the original image.
“Add a cat” leaves most visual decisions to the model. Describing the cat’s location, scale, expression, fur color, and viewing direction gives the AI photo editor a clearer target.
Regional Editing vs. Full-Image Regeneration
Full-image regeneration is useful when you want to change the overall environment, composition, or visual style.
Regional editing is more appropriate when most of the original image should remain unchanged.
| Editing Method | Best Used For |
|---|---|
| Full-image generation | Creating a new scene, changing the complete composition, or exploring a new visual direction |
| Regional editing | Adding objects, replacing products, modifying clothing, or repairing defects |
| Multi-region editing | Making several independent changes in one image |
For ecommerce images and brand assets, multi-region editing can reduce the uncertainty caused by repeatedly regenerating an entire scene.
For example, a single product lifestyle image can use separate regions to adjust its packaging, tabletop decoration, background lighting, and promotional props.
Conclusion
Controlled AI image editing needs to answer two questions:
- Where should the image change?
- What should appear in that location?
Rectangular selections define the position. Text descriptions control the generated content.
By combining both, the same image can receive a cat, bubble, yarn ball, abstract blocks, and blanket while the remaining room stays visually consistent.
When using the Seedream 5.0 Pro AI Image Editor, select each region first and then describe its object, color, material, scale, position, and lighting relationship. This provides more control than giving the model one broad editing request.
You can try this regional editing workflow with WeShop Seedream 5.0 Pro.