








Seedream 5.0 Pro Clothes Swap: Generate a 2K Dress Change from Two Reference Images
Learn how to use Seedream 5.0 Pro to swap a dress from a reference image while preserving the model’s pose, improving fabric details, and generating a 2K result.
A model photo and a dress reference can be enough to create a new 2K fashion image without rebuilding the entire shot.
In this example, the goal is very specific: keep the model's original pose and body proportions, replace the outfit using a second dress image as reference, improve the embroidery and sheer-fabric details, and make the final skirt reach the floor without dragging.
This makes the workflow useful for eveningwear, formal dresses, fashion concepts, and ecommerce teams that want to test how a garment could look on an existing model image.
What This Seedream 5.0 Pro Clothes Swap Is Designed to Do
The task is not to generate a completely new model.
Instead, the edit focuses on a few controlled changes:
- Preserve the pose and body proportions from Figure 1.
- Replace the existing outfit using Figure 2 as the clothing reference.
- Improve the visible embroidery details.
- Preserve a clearer sheer-fabric appearance.
- Give the garment a satin-like material finish.
- Extend the skirt to the floor without making it drag.
- Generate the result at 2K.
Seedream 5.0 Pro supports reference-image-guided editing, which makes this type of workflow useful when you want to change one important visual element while keeping the rest of the composition relatively stable.
Input Images
| Figure 1 — Model Image | Figure 2 — Dress Reference |
|---|---|
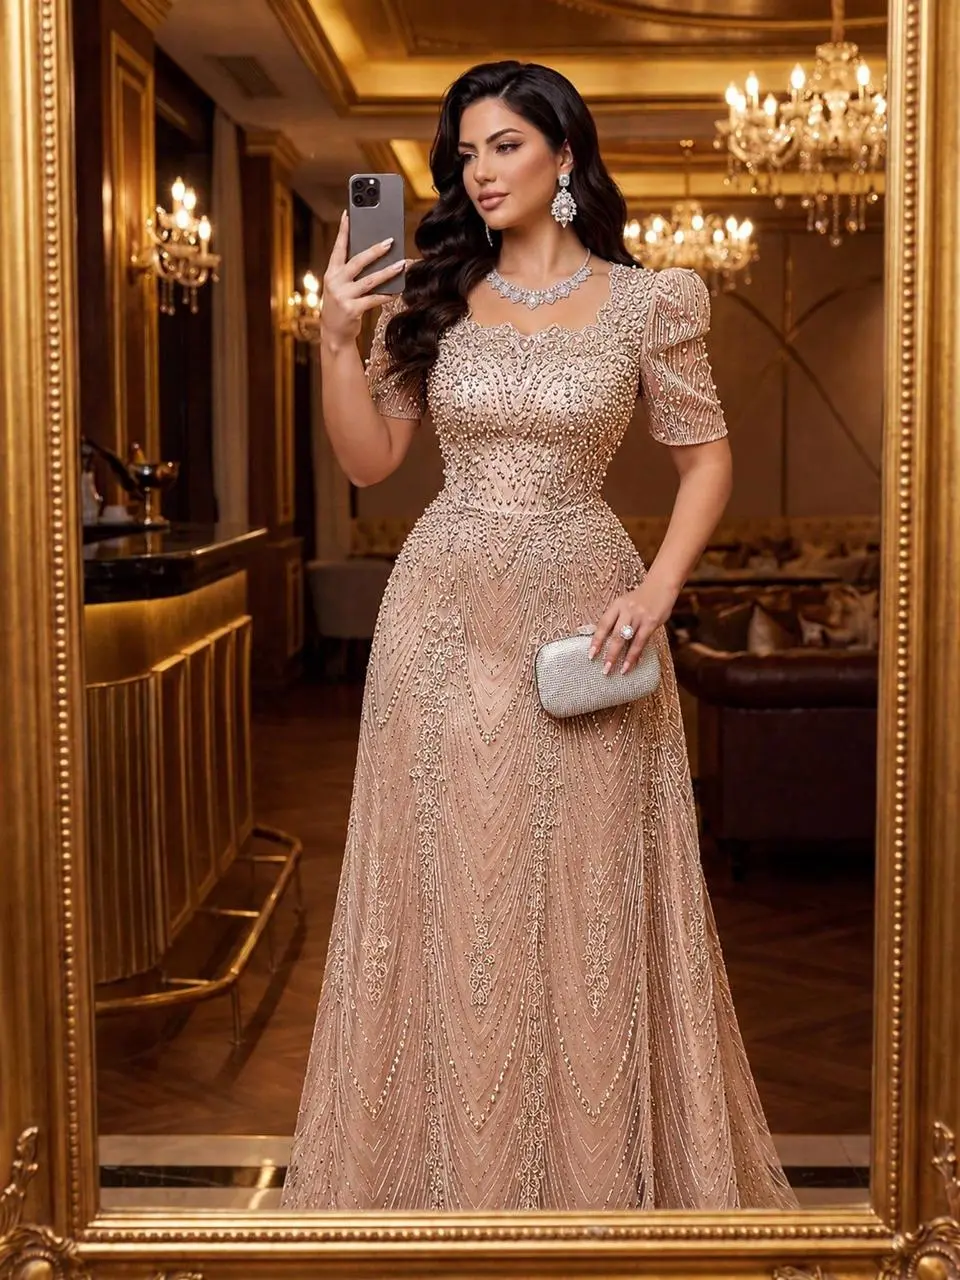 | 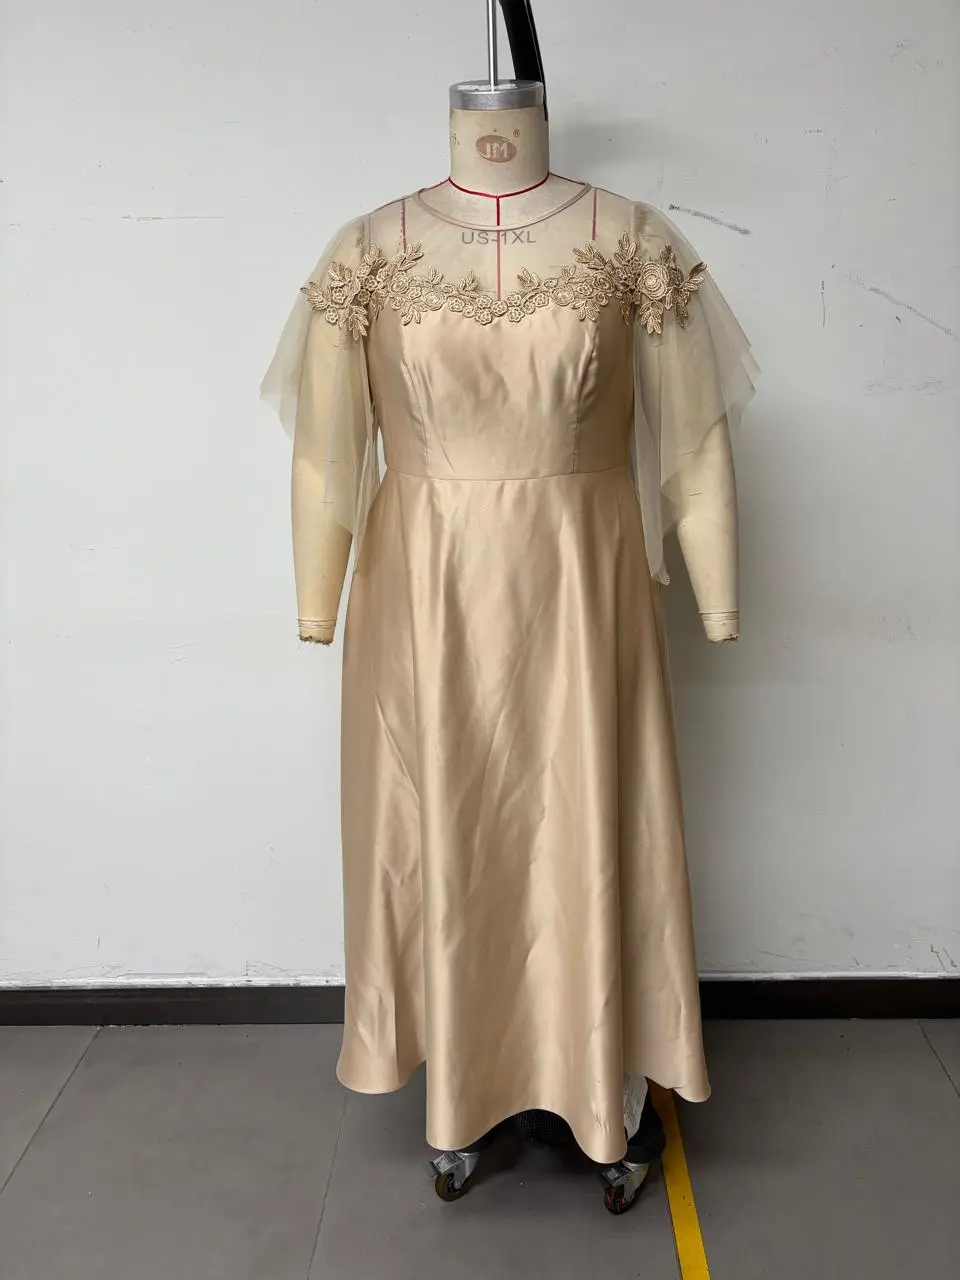 |
| Keep the model, pose, and overall composition. | Use the garment shape, satin material, embroidery, and sheer details as reference. |
What You Need
The workflow only requires a few inputs.
-
A model image
Figure 1 is the main image to edit. It provides the model, pose, body proportions, framing, and overall scene.
-
A garment reference
Figure 2 provides the clothing direction you want Seedream 5.0 Pro to follow.
-
A clear editing prompt
The prompt should explicitly separate what needs to change from what needs to remain unchanged.
-
Seedream 5.0 Pro
Open the tool here:
Step 1: Upload the Model and Dress Reference
Upload the model photo as Figure 1, then add the dress image as Figure 2.
The important part is to give each reference a clear role:
- Figure 1 controls the model and pose.
- Figure 2 controls the clothing direction.
- The prompt defines which garment details matter.
- The prompt also tells the model what should remain unchanged.
This is especially useful when you already have a model image you like and only want to explore a different dress or fashion style.
Step 2: Use the Clothes Swap Prompt
Use the following prompt:
Change the close-up of the clothes in Figure 1 to that of Figure 2. The texture of the embroidery should be better! The texture of the sheer fabric should be better!! For different styles, the clothes are made of satin material! The skirt length should reach the ground but not drag on the ground. Do not change the pose and figure of the model in Figure 1!!!
The prompt handles five important parts of the edit.
Replace the outfit
The instruction tells Seedream 5.0 Pro to change the clothing in Figure 1 using Figure 2 as the reference.
Improve embroidery detail
The embroidery is explicitly called out so the generated garment does not rely only on the overall silhouette.
Refine sheer fabric
Sheer material can easily lose its translucent appearance during AI editing, so the prompt asks for stronger fabric texture.
Define the material
The satin instruction gives the dress a clearer material direction instead of leaving the fabric interpretation open-ended.
Preserve the model
The final instruction is particularly important:
Do not change the pose and figure of the model in Figure 1!!!
It tells the model that the person should remain the stable part of the image while the garment changes.
Step 3: Set Seedream 5.0 Pro to 2K
For this example, use:
- Model: Seedream 5.0 Pro
- Aspect Ratio: Auto
- Image Size: 2K
- Output Format: JPEG
Then click Generate.
You can try it directly using the tool on the right.
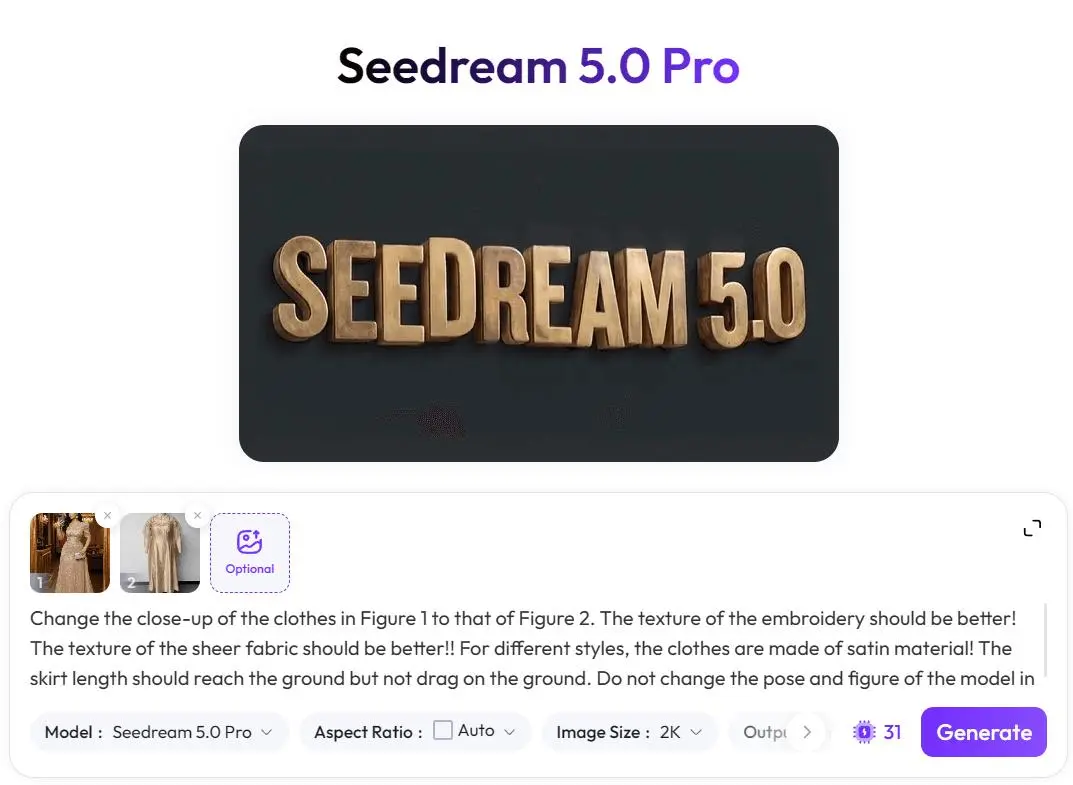
Seedream 5.0 Pro configured to generate the clothes-swap result at 2K.
Step 4: Check These Four Details in the Result
Do not evaluate the image only by whether it looks attractive. First check whether the edit actually followed the task.
1. Did the Model's Pose Stay Consistent?
The prompt specifically asks Seedream 5.0 Pro not to change the model's pose or figure.
Compare the generated image with Figure 1 and check the model's posture, hand position, body proportions, and framing.
2. Does the Dress Follow Figure 2?
Look at the overall silhouette, neckline, shoulder treatment, skirt length, and material direction.
The generated dress does not need to copy every pixel of the reference, but the clothing should clearly move toward the intended design rather than simply creating another unrelated gown.
3. Are the Embroidery and Sheer Details Visible?
Pay particular attention to areas such as the neckline, shoulders, sleeves, and upper bodice.
These are the areas where the embroidery and sheer material should be easiest to evaluate.
4. Does the Skirt Reach the Floor Without Dragging?
The prompt defines a very specific hem length: the dress should reach the ground without extending into a long train.
This small instruction can make the finished fashion image look more controlled and closer to the intended garment presentation.
Assets to be added | Display format: single final result image. Please insert the 2K clothes-swap result generated by Seedream 5.0 Pro for this example to showcase the final garment, embroidery, sheer fabric, and skirt effect.

Final clothes-swap result generated from the model image and dress reference.
| Before | After |
|---|---|
| 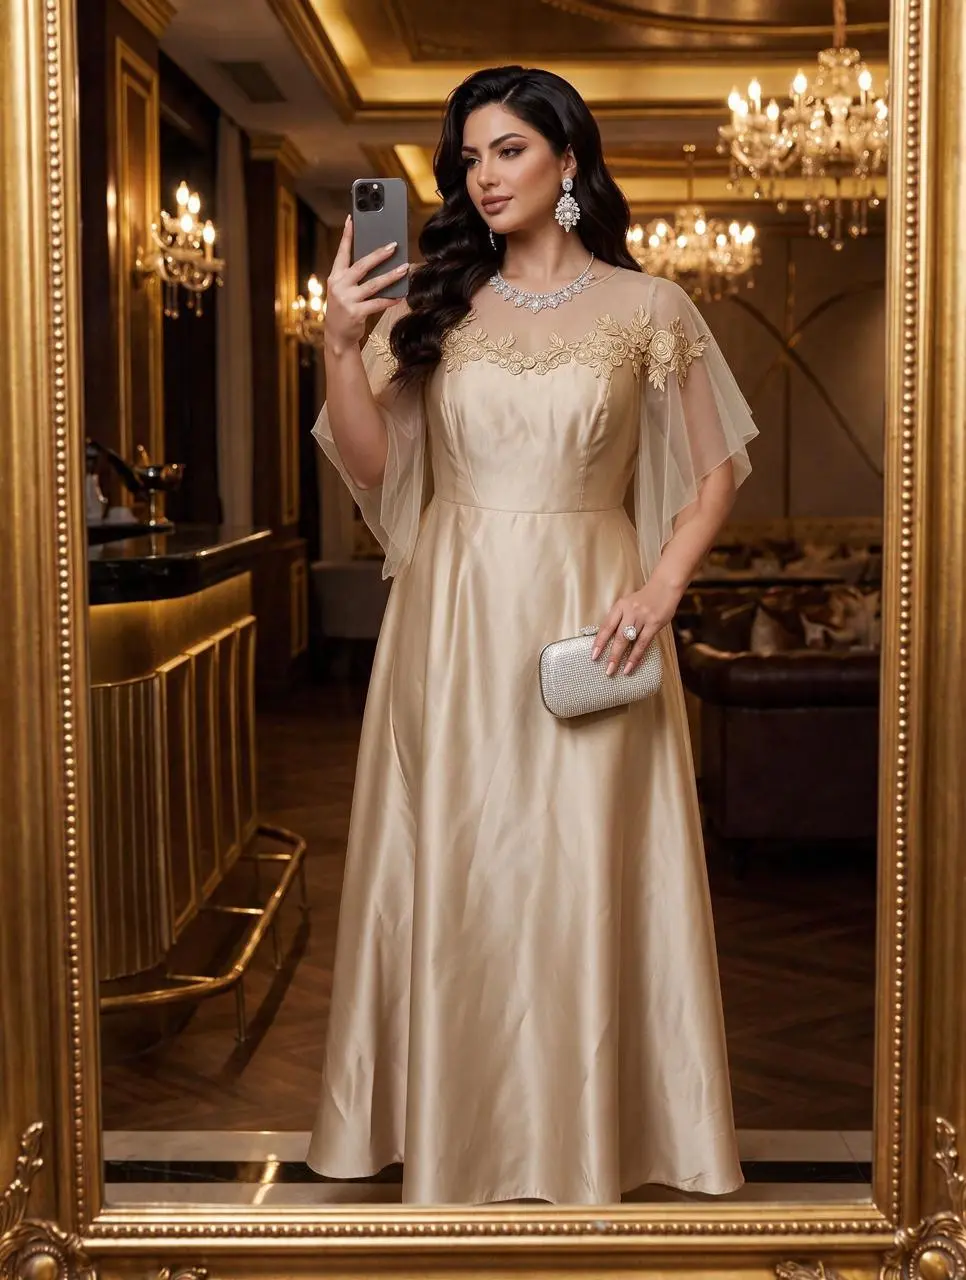 |
| Original model and outfit | 2K clothes-swap result |
Why This Workflow Is Useful for Fashion Images
For fashion content, you often do not need another completely new AI image. You may already have a model pose, framing, and scene that work.
The actual problem is much narrower: keep that image and test a different garment.
Using a model image, a separate clothing reference, and a prompt that clearly defines both the editable and protected areas gives Seedream 5.0 Pro a more focused job. Instead of simply asking for a "better dress," you are specifying the garment reference, material, embroidery, sheer fabric, skirt length, and the parts of the original model that should remain stable.
Turn One Model Photo Into a New Fashion Direction
The finished image should still feel connected to the original model shot, but with the garment carrying a completely different design direction.
That is what makes this workflow practical: start with the model image you already have, add the dress you want to test, and use Seedream 5.0 Pro to bring the two together in a 2K result.
Try the same workflow with your own model and garment references in Seedream 5.0 Pro: