





WeShop Canvas Tutorial: Create Apparel Poses and Showcase Videos
Learn how to use WeShop Canvas to plan, refine, and generate apparel pose variations, Skill-based image branches, and a five-second showcase video.
WeShop Canvas Hands-On Tutorial: From Two Reference Images to Poses, Skills, and a Showcase Video
Build a complete apparel workflow from two reference images.
Create a dressed base image, explore three poses, branch Pose B into two Skill results, and finish with a five-second showcase video—all on one traceable Canvas.
Download WeShop Canvas →This tutorial follows one complete project from beginning to end. Starting with two images, you will:
- Dress the person in Image 1 in the pink outfit from Image 2;
- Create Pose A, Pose B, and Pose C from the base image;
- Apply the Apply Photo Filter Skill to Pose B;
- Apply the Change Pose Skill to Pose B;
- Turn Pose B into a five-second silent showcase video.
The finished Canvas is shown below. Each connection means that the node on the right was created from the node on the left, so every result remains traceable to its source.
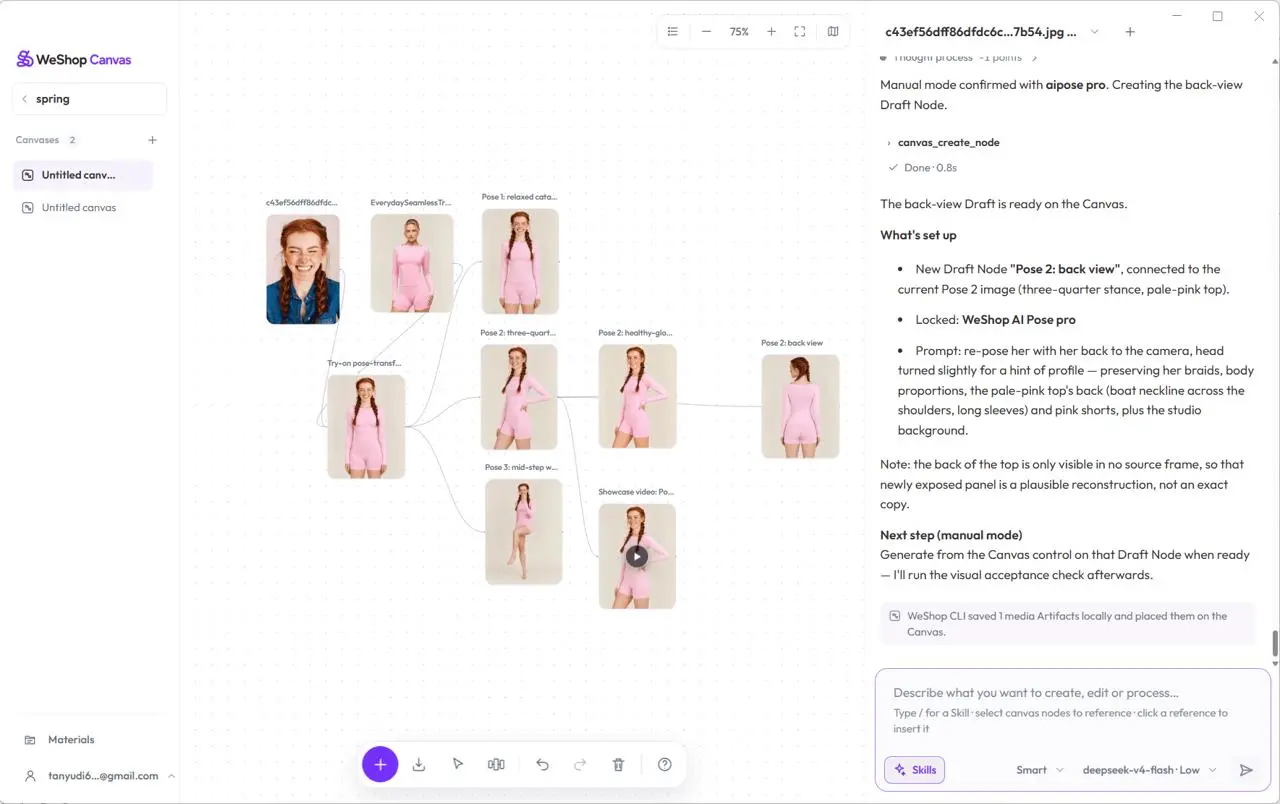
Person + apparel reference
Base image + three poses
Two Skill edits + video
[!NOTE] This guide is based on the actual WeShop Canvas 0.1.10 interface and the recorded project shown in the screenshots. Available models and parameters may change. Your generated media may differ, but the node structure and operating sequence should be the same.
Step 1: Drag the two source images onto the Canvas
Prepare the files
Use two images that you are authorized to process:
| Image | Purpose in this project |
|---|---|
| Image 1: red-haired woman with braids | Provides the person who will wear the new outfit. |
| Image 2: model wearing a pink set | Provides the clothes to place on the person in Image 1. |
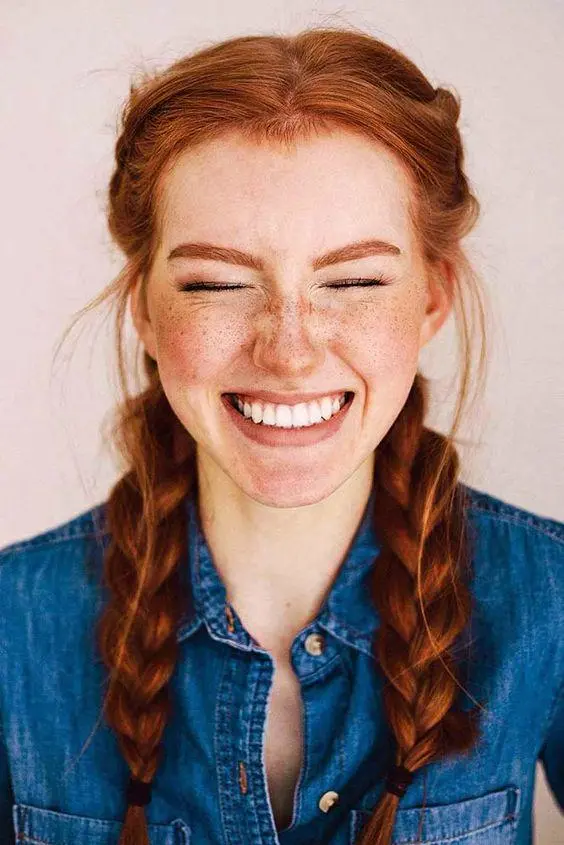
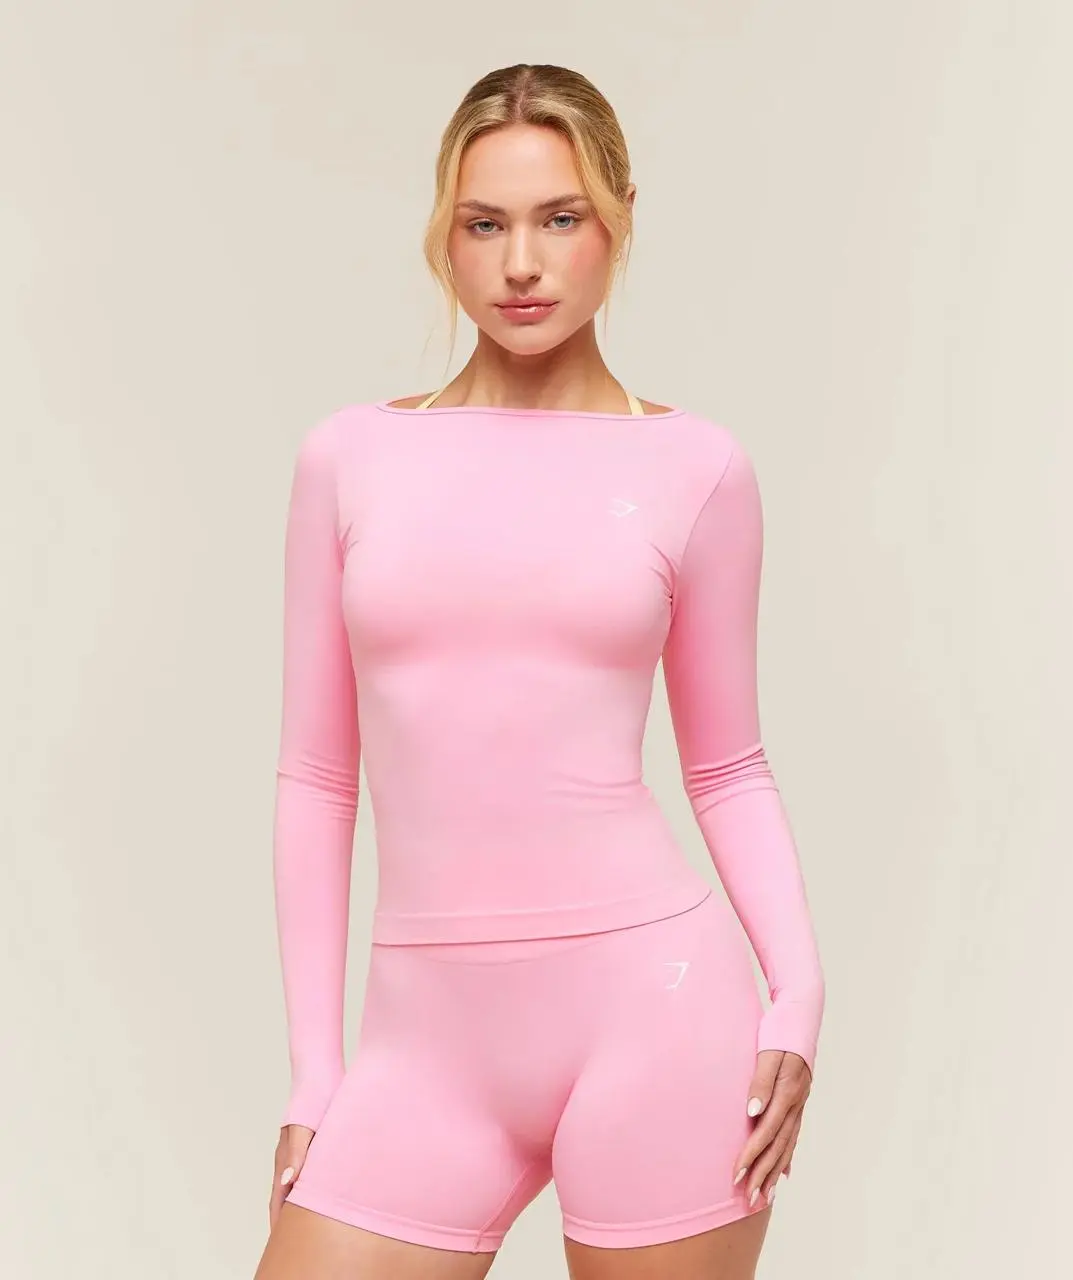
Create the Project and add the images
- Open WeShop Canvas and click New Project on the home screen.
- Enter a Project name, choose a storage location if needed, and click Create Project.
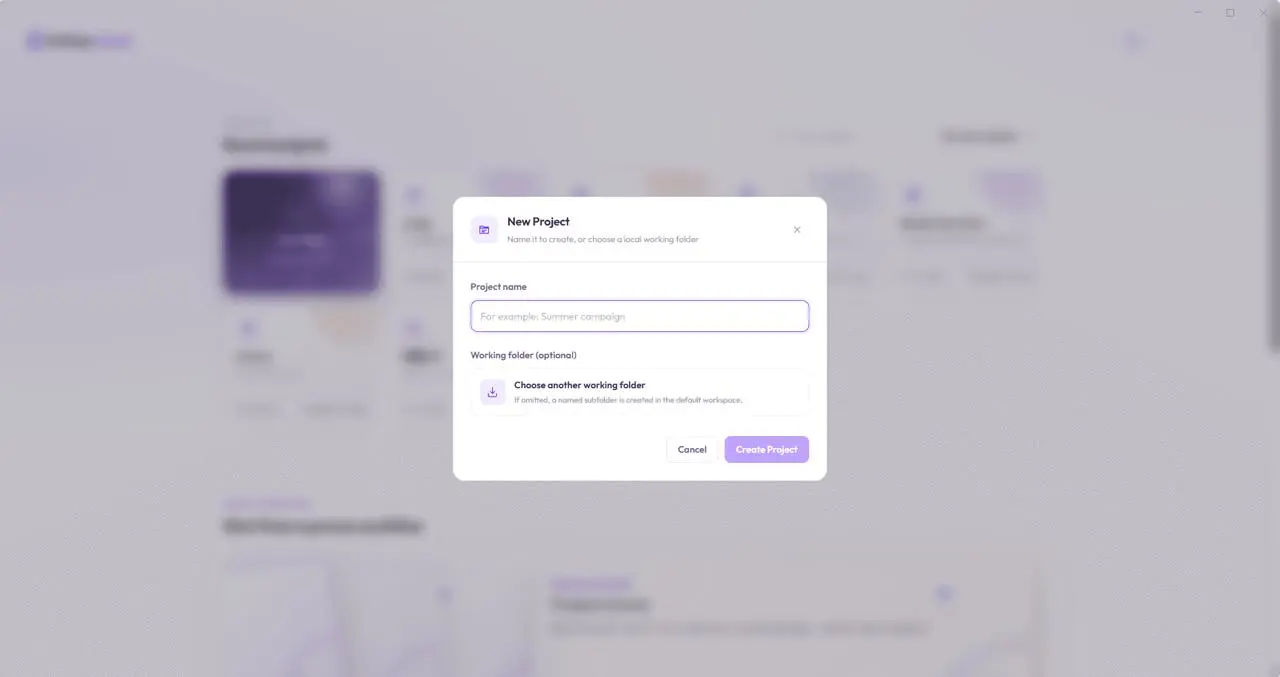
- Open the new Canvas. In your computer's file browser, select Images 1 and 2 and drag them onto an empty area of the Canvas.
- Wait until each image appears as a separate image node.
- Select both nodes. Both images should now be attached as references above the conversation input on the right.

The two source images remain as independent Canvas nodes. Connections added later will make every generated result traceable to these inputs.
Step 2: Select both images and submit the outfit request
Keep both image nodes selected. Enter the same request used in this project in the conversation input:
Dress the person in Image 1
@20260821_1_3fb66cd…1186.pngin the clothes from Image 2EverydaySeamlessTr…40x.webp.
The two filenames are Canvas references. Your files may have different names. Insert your own references from the Canvas suggestions instead of typing the example filenames manually.
Click Send. The conversation history records the two references and your request. The Agent then reads and inspects both images before proposing an implementation.
Checkpoint: The history shows both references, your original request, and the Agent's reasoning entries.
Step 3: Review the Agent's plan and choose manual generation
After inspecting the inputs, the Agent proposes a generation plan. You choose how to execute it at this point.
What should appear in the conversation history
| Stage | Expected record |
|---|---|
| Agent reasoning | The Agent identifies the person in Image 1 and the outfit in Image 2, then proposes one base try-on image. |
| Workflow confirmation | The plan lists the source images, image model, one output, and a Uses power label. |
| Your choice | Click Create for manual generation. |
| Agent activity | The history confirms manual execution and shows a completed canvas_create_node activity. |
| Canvas update | A base-image Draft appears, connected to both source nodes. |
What manual generation means here
Choose Create for manual generation on the plan card:
flowchart LR
    A[Submit the outfit request] --> B[Agent analyzes it and proposes a plan]
    B --> C[Choose Create for manual generation]
    C --> D[Canvas creates a Draft and connections]
    D --> E[Review its prompt and parameters]
    E --> F[Click Generate on the Draft]
    F --> G[Approve the image-generation API call]
- Create for manual generation creates the configured Draft and its connections, then pauses for your review. Creating the Draft does not call a paid image or video generation API.
- Create and generate automatically creates the workflow and continues into generation.
- The Agent's analysis and planning may use conversation-model points, shown beside Thought process.
- The image-generation API is submitted only after you click Generate on the Draft and approve the paid operation.
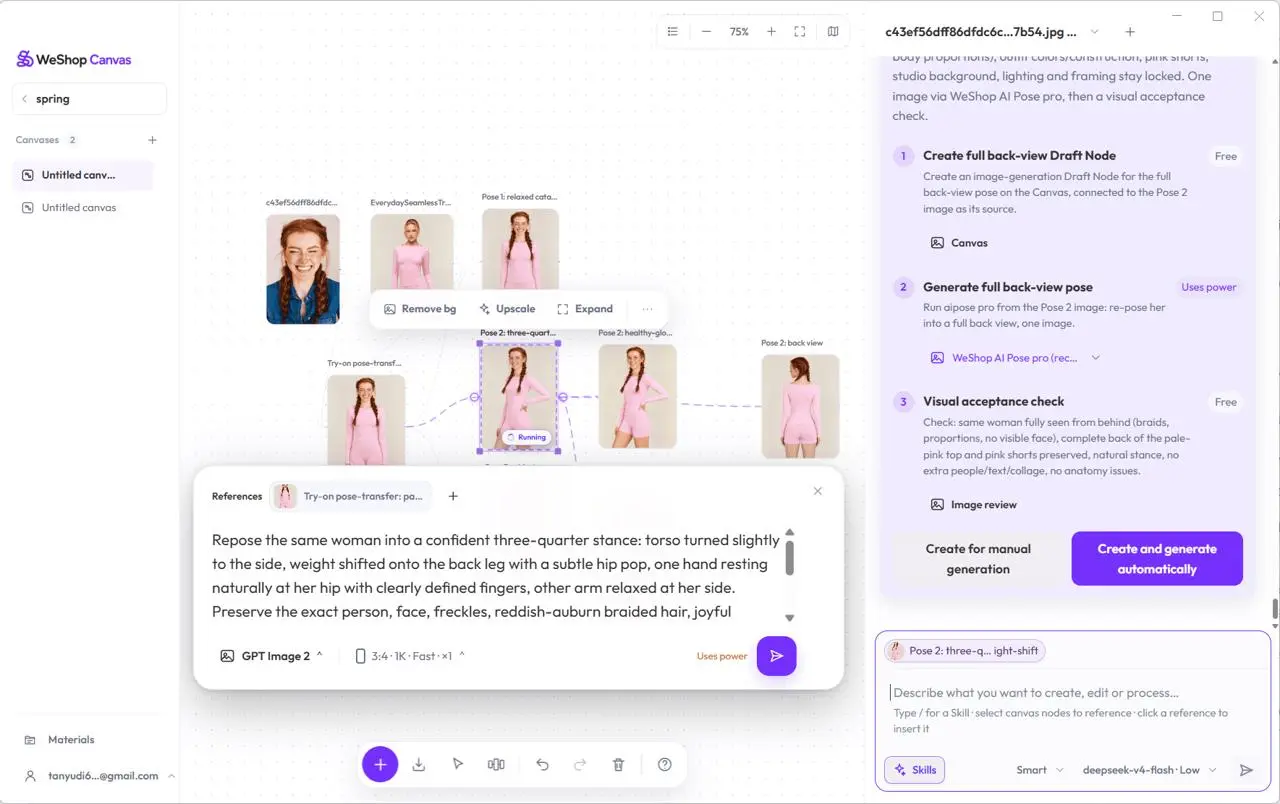
Click Create for manual generation. Wait until the history confirms manual execution and shows canvas_create_node as completed.
Generate the base-image Draft
- Click the new base-image Draft.
- Review its references, prompt, image model, and output quantity.
- Click Generate.
- When the paid-operation confirmation appears, click Just this once.
- Wait for the image to return to the node, then name it ① Person Replacement · Pink Outfit.
Review the result: The person should come from Image 1. The pink long-sleeve top, matching shorts, front-facing stance, and studio background should follow Image 2.
Step 4: Create Pose A, Pose B, and Pose C from base image ①
Select the base image
Click ① Person Replacement · Pink Outfit and make sure it is the only reference attached to the conversation input.
Enter the three-pose request
Use the selected base image ① as the only identity and outfit reference. Preserve the same person, red hair with two braids, pink long-sleeve top, matching shorts, garment construction, colors, and studio background. Plan three separate results:
- Pose A: relaxed front-facing stance;
- Pose B: three-quarter stance with one hand resting naturally at the waist;
- Pose C: natural forward-walking pose.
Keep the full person in frame with natural hands. Do not change the outfit. Place all three results on the current Canvas, connect them to base image ①, and show me the plan before generating.
Click Send.
Review and create the three Drafts
Confirm that the plan contains three separate one-image steps, all using base image ①. Click Create for manual generation. The history should record three completed canvas_create_node activities, and three connected Drafts should appear on the Canvas.
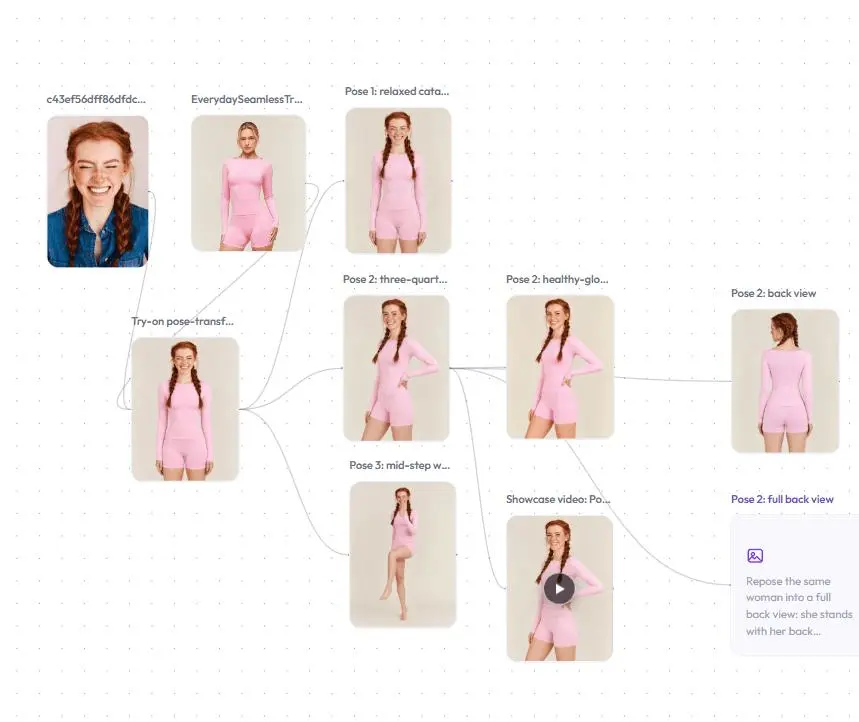
Generate the poses
- Select the Pose A Draft, review its parameters, click Generate, and approve the operation.
- Repeat for Pose B.
- Repeat for Pose C.
- When each result is delivered, the history records the generation activity and confirms that the media artifact was placed on the Canvas.
- Click Fit the canvas in view and open all three results for comparison.
Check the face, braids, pink outfit, hands, and background for consistency. The remaining steps use ③ Pose B · Three-quarter, One Hand at Waist.
Step 5: Apply a bright commercial look with the Apply Photo Filter Skill
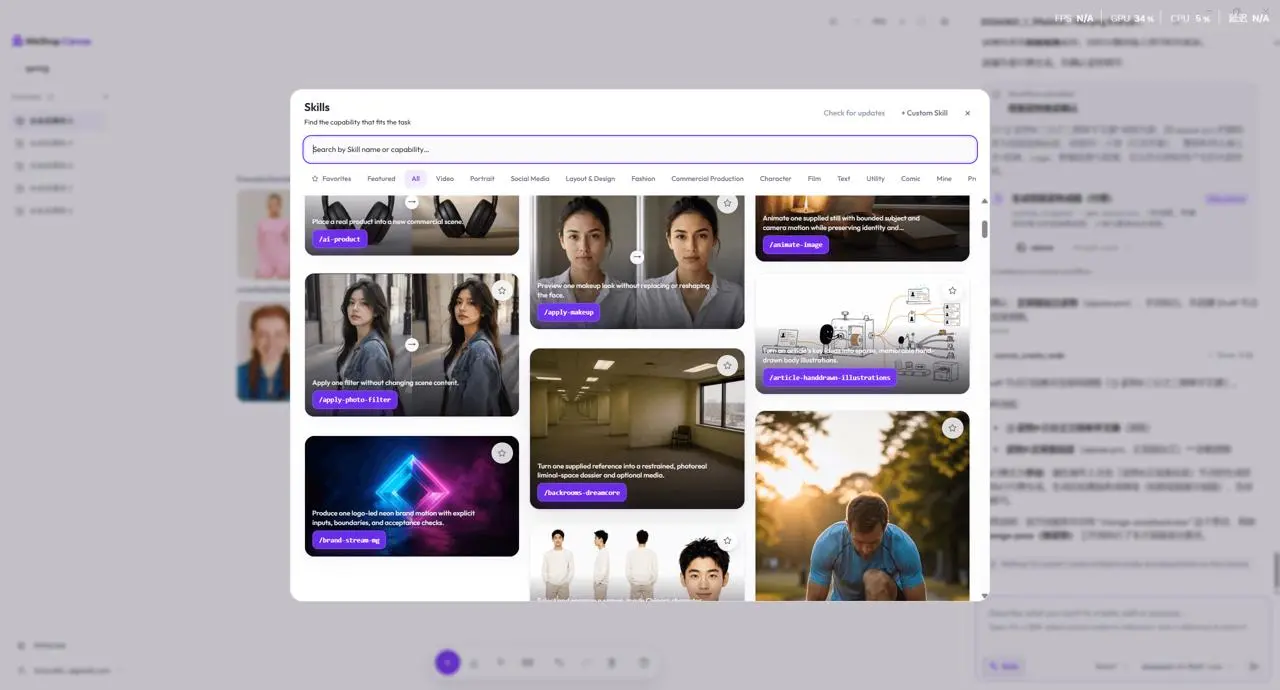
Open the Skill
- Select Pose B.
- Click Skills at the lower-left of the conversation input.
- Search for
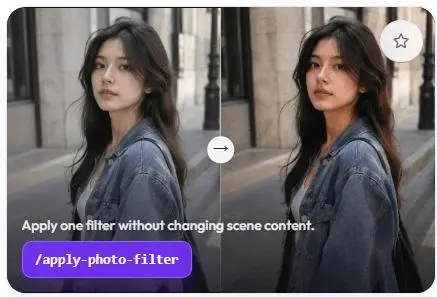
apply-photo-filter. - Open Apply Photo Filter and confirm that it applies a filter without changing the scene content.
- Click Use Skill.
Enter this request:
Use the Apply Photo Filter Skill to give the selected Pose B a bright, clean, natural e-commerce look. Change only brightness, tone, and contrast. Preserve the person, pose, pink outfit, garment construction, logo, and studio background. Add no text or accessories. Create one result and show me the plan before generating.
Click Send, check that the plan uses Pose B and creates one image, then click Create for manual generation. Wait for canvas_create_node, select the new Draft, click Generate, and approve Just this once.
The conversation keeps the Skill command, Agent analysis, proposed workflow, manual-execution confirmation, and canvas_create_node activity together.
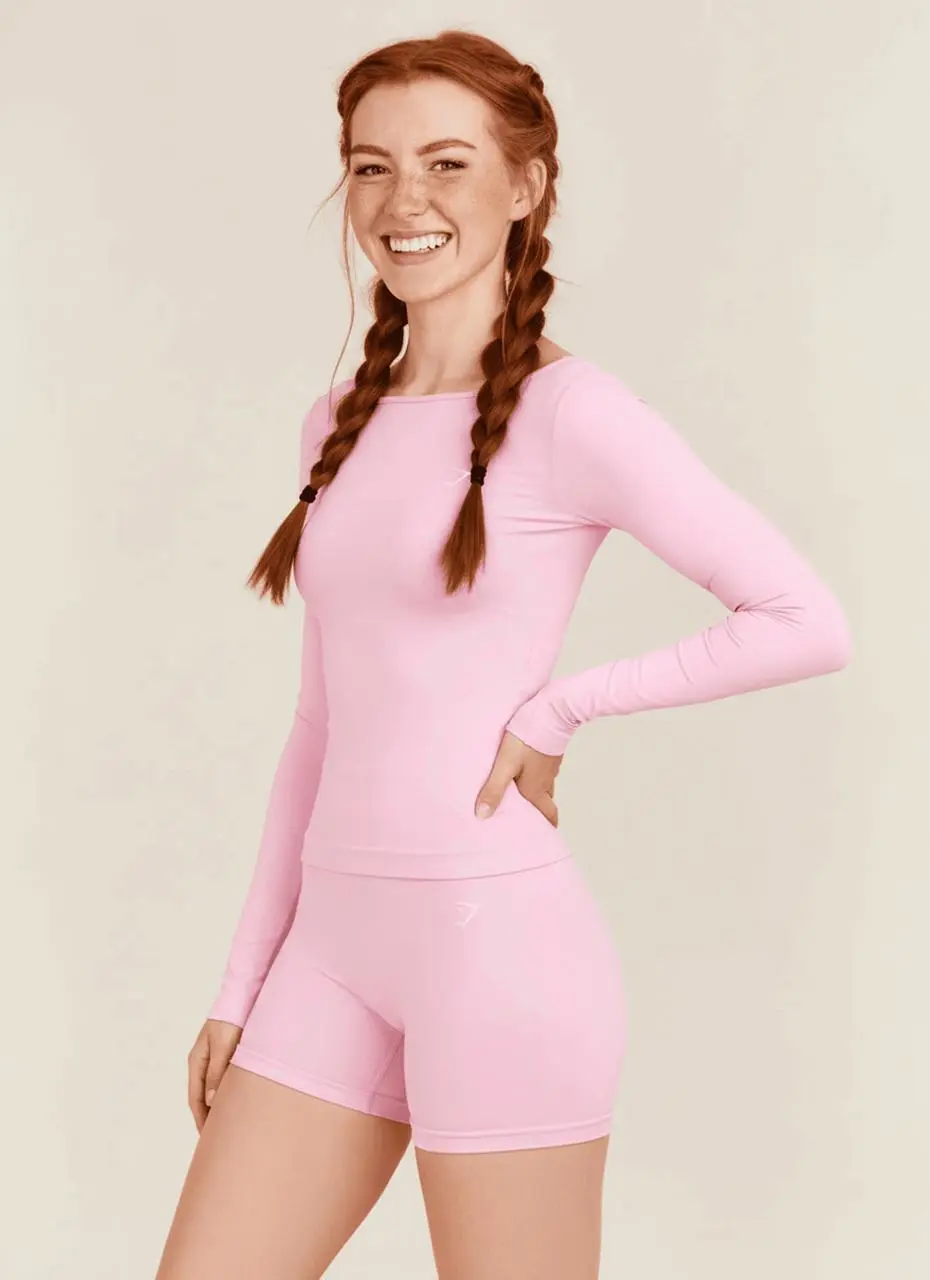
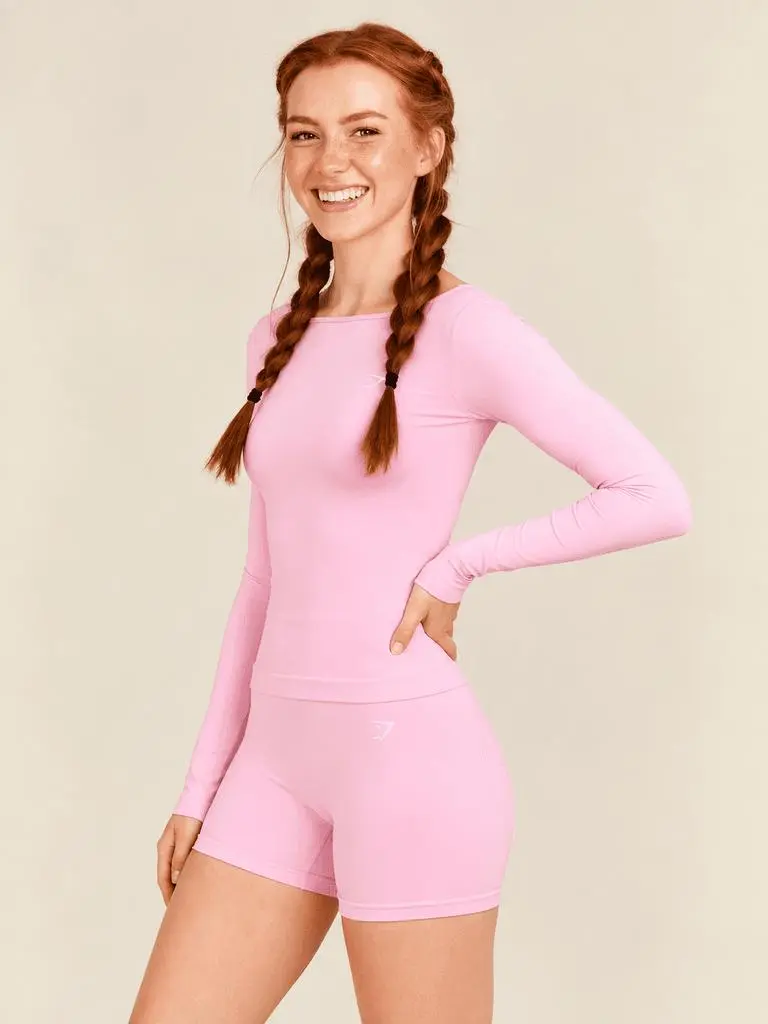
Check that the person, gesture, garment outline, and logo remain intact before comparing brightness, skin tone, outfit color, and background tone.
Step 6: Create a back-facing stance with the Change Pose Skill
- Select the original Pose B rather than the filtered result.
- Click Skills, search for
change-pose, open Change Pose, and click Use Skill. - Enter:
Use the Change Pose Skill to turn the selected Pose B into a natural back-facing standing pose. Preserve the same person, red hair with two braids, pink seamless long-sleeve top, matching shorts, garment outline, logo, color, and studio background. Keep the full person in frame and add no text or accessories. Create one result and show me the plan before generating.
- Click Send. In this recorded case, the Agent explains how it maps the request to the available
change-poseworkflow. - Review the source, pose direction, model, and quantity. This case uses
airpose prowithstraight_back. - Click Create for manual generation and wait for the manual confirmation and completed
canvas_create_nodeentry. - Select the connected back-pose Draft, confirm
airpose / straight_back, and click Generate.
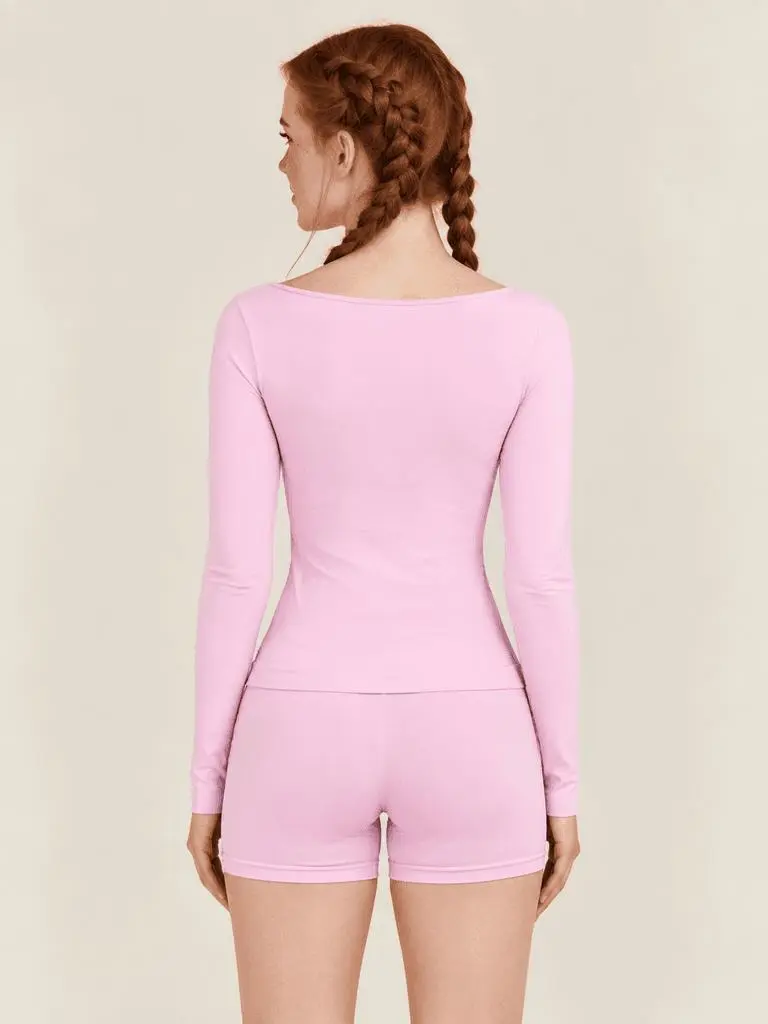
Review the braids, neckline, sleeves, back outlines of the top and shorts, logo placement, and body proportions. Keep this result as a new branch from Pose B.
Step 7: Create a five-second showcase video from Pose B
- Select the original Pose B again.
- Enter:
Use the selected Pose B as the first frame of a five-second apparel showcase video with no audio. The person should make only subtle, natural breathing and weight-shift movements while the camera remains still. Preserve the identity, red hair with two braids, pink outfit, logo, colors, background, and garment construction. Create one video on the current Canvas and show me the plan before generating.
- Click Send.
- Check that the plan shows
weshop_cli kling, Kling 3.0, five seconds, audio off, one output, and Uses power. - Click Create for manual generation. The history should confirm manual execution and show a completed
canvas_create_nodeentry for a Draft connected to Pose B.
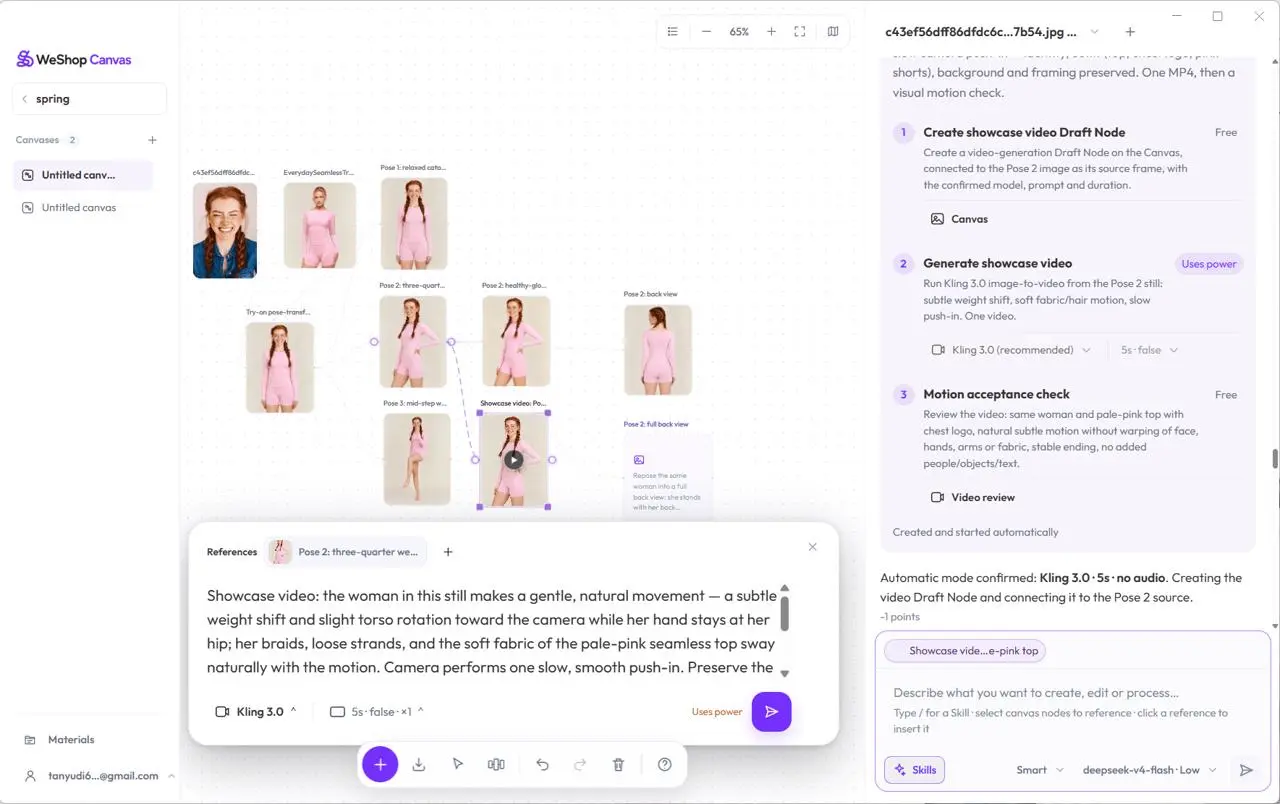
- Select the video Draft and recheck Kling 3.0, five seconds, no audio, and one output.
- Click the node's generation control and approve Just this once.
- When the video is delivered, click the play button in the center of the video node.
You can try it directly using the tool on the right.
During playback, check that the face, braids, arms, pink outfit, and background remain stable and that there are no abrupt changes at the beginning or end.
Step 8: Verify the complete workflow and save the results
Click Fit the canvas in view and confirm this structure:
flowchart TD
    A[Image 1 · Person] --> C[Base image · Pink outfit]
    B[Image 2 · Outfit] --> C
    C --> D[Pose A]
    C --> E[Pose B]
    C --> F[Pose C]
    E --> G[Commercial filter]
    E --> H[Back-facing pose]
    E --> I[Showcase video]
To save one result:
- Right-click the target image or video node.
- Click Save As.
- Choose a location and filename in the system dialog.
- Open the saved file and verify that the image displays correctly or the video plays normally.
To save several results, hold Ctrl on Windows or ⌘ on macOS, select the nodes, right-click, and choose Save selected as.
If the conversation and Canvas do not match
| Problem | What to do |
|---|---|
| The Agent assigned the wrong source role | Stop at the plan. Check both references and state clearly which image controls the person, outfit, pose, or background. |
| The plan is correct but no Draft appears | Look for a completed canvas_create_node entry. Wait if it is running; follow the displayed recovery message if it failed. |
| A Draft exists but has no result | This is expected in manual mode. Select the Draft, review its parameters, and click Generate. |
| You do not want to spend generation power | Choose Not now in the paid-operation confirmation. The Draft and prompt remain available for later. |
| You cannot find a new node | Click Fit the canvas in view or open Node list and search for its name. |
| You need to add instructions to a running task | Enter the additional requirement and click Add to current task. Click Stop if the task should end. |
| You moved or deleted a node by mistake | Immediately click Undo and confirm that both the node and its connections return. |
Build your first connected apparel workflow
Prepare one person image and one apparel reference, then follow the tutorial from the first conversation request to the final showcase video.
Download WeShop Canvas and create your first node workflow →