






AI Jewelry Product Photos for Shopify: Create a Ring Model Shot with GPT Image 2
Learn how to turn a ring product cutout into a realistic Shopify lifestyle photo with GPT Image 2 while preserving its true scale and details.
A white-background ring photo shows the product clearly, but it does not show shoppers how the jewelry looks when worn. For a Shopify jewelry store, that missing sense of scale can make a delicate ring difficult to evaluate.
In this tutorial, we turn a standalone image of the Polly Black Onyx Bobble Ring into a natural model photo with GPT Image 2. The key is to provide more than a general model description: adding the ring’s real measurements helps the AI understand its size and preserve its delicate proportions.
| Original ring image | AI-generated model photo |
|---|---|
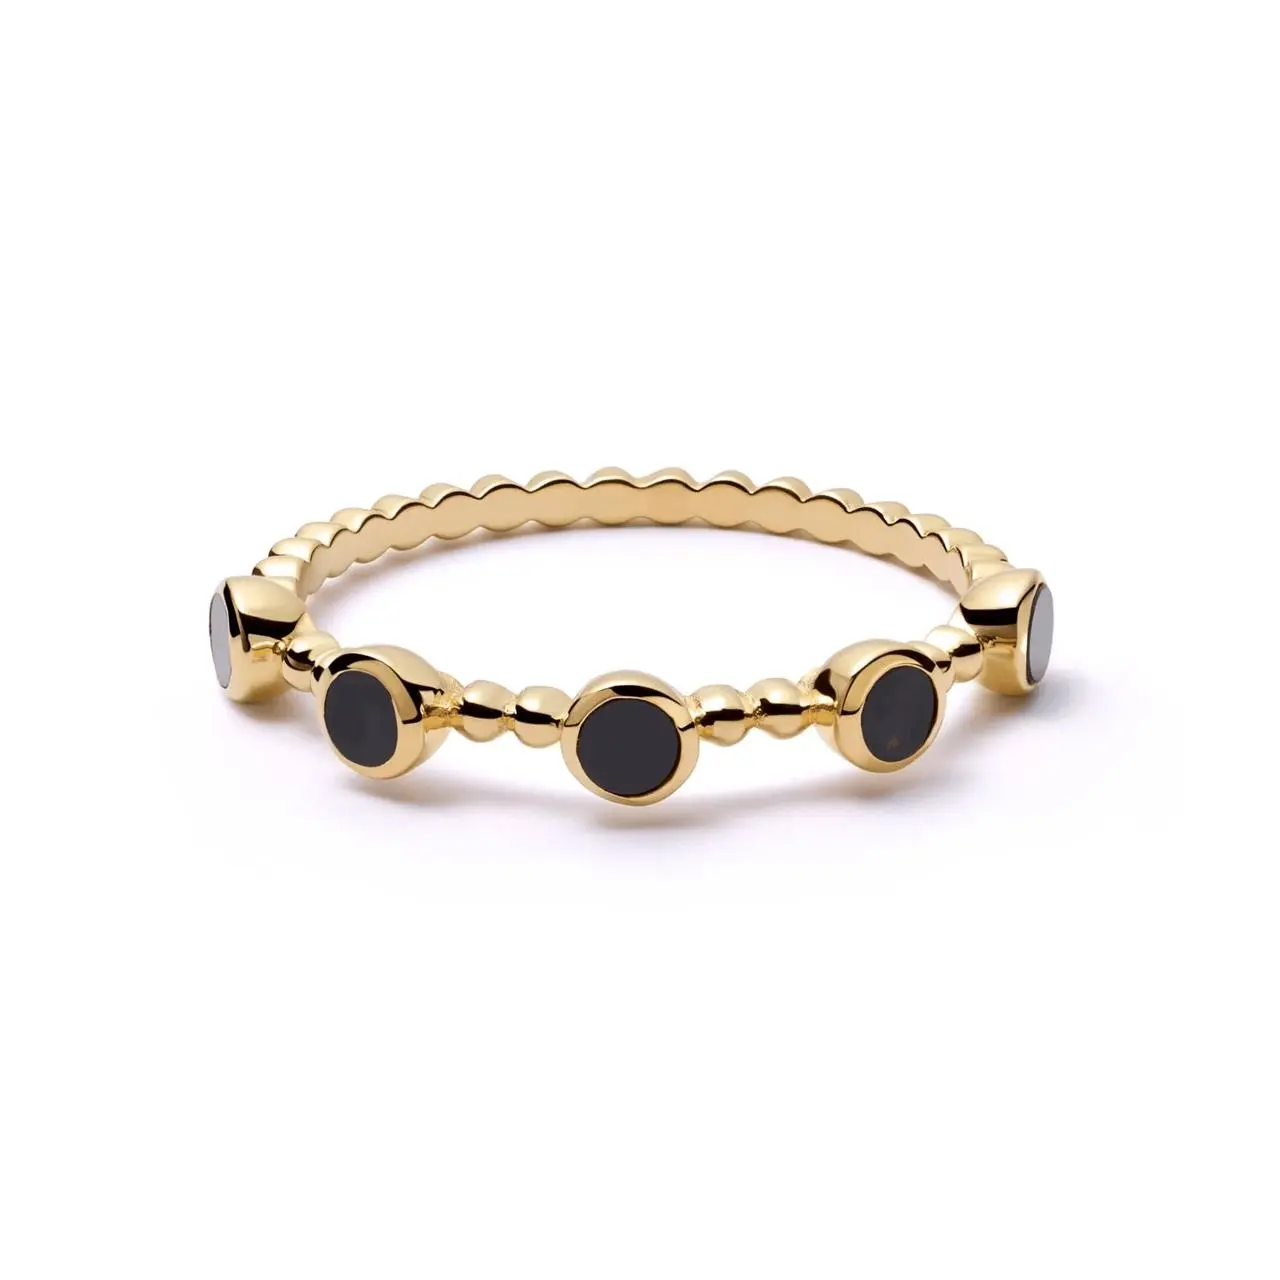 | 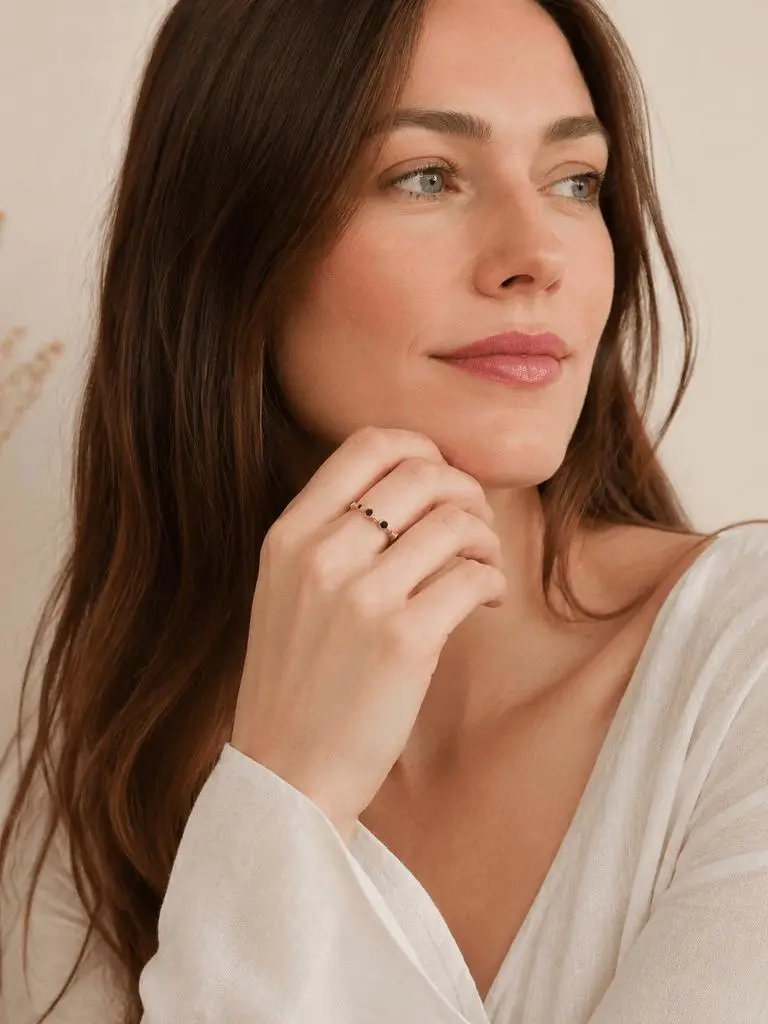 |
| The original product image provides the ring’s design reference. | The generated lifestyle image shows how the ring looks when worn. |
Prepare the Ring Image and Product Details
You need two things before generating the AI jewelry product photo:
- A clear image of the ring against a simple background.
- Accurate product details copied from your Shopify listing or product specification sheet.
The product details used in this example are:
- Product: Polly Black Onyx Bobble Ring
- Band width: 1 mm
- Stone size: 3 mm × 3 mm
- Weight: 1 g
These measurements matter when generating photos of small jewelry. If the prompt only says “make the model wear this ring,” the generated band or stones may appear larger than the real product.
Adding the actual dimensions gives GPT Image 2 a clearer scale reference.
Step 1: Upload the Ring to GPT Image 2
Open WeShop AI GPT Image 2 and upload the original ring photo.
Choose an image in which:
- The complete ring is visible.
- The product is not cropped.
- The gold band and black stones are easy to distinguish.
- No other jewelry competes with the main product.
A clean product image gives the model a stronger visual reference for the shape, materials, colors, and decorative details it needs to preserve.
Step 2: Describe the Model and Product Shot
Specify who should wear the ring and how the final image should look.
For this example, the requested subject is a 30-year-old, long-haired White female model. The goal is a natural lifestyle photo suitable for a Shopify jewelry product page, with the model’s hand positioned close enough to make the ring visible.
The prompt should cover:
- The model’s age and appearance.
- The way she displays the ring.
- The complete product name.
- The ring’s real dimensions and weight.
- The design details that must remain unchanged.
- The desired lighting, setting, and photographic style.
Step 3: Add the Complete GPT Image 2 Prompt
Copy and adapt this prompt:
A 30-year-old, long-haired White female model is wearing and showcasing the product shown in the reference image.

Product details:
Polly Black Onyx Bobble Ring
Band width: 1 mm
Stone size: 3 mm × 3 mm
Weight: 1 g

Create a natural, photorealistic e-commerce lifestyle product photo suitable for a Shopify jewelry product page. Show the ring clearly on the model’s finger while keeping the original ring design unchanged.

Preserve the gold bobble band, the number and arrangement of the black onyx stones, the stone shapes, the polished metal finish, and the delicate real-world scale of the ring. Do not enlarge or redesign the ring.

Use soft natural lighting, realistic skin texture, and a clean neutral setting. Keep the ring in sharp focus and make it easy for shoppers to see.
The first sentence defines the model and action. The product block supplies the real specifications, while the remaining instructions control product fidelity, composition, lighting, and photographic style.
For another piece of jewelry, replace the product name and measurements with the correct information from that item’s listing.
Step 4: Generate and Review the Ring Photo
Generate the image, then compare it with the original product photo. Check whether:
- The ring is placed naturally on the finger.
- The gold bobble band remains recognizable.
- The black stones retain the intended shapes and arrangement.
- The band and stones have realistic proportions.
- The fingers and hand anatomy look natural.
- The ring is sharp enough for shoppers to inspect.
If the ring appears too large, add this instruction and generate another version:
Keep the ring at its delicate real-world scale. Do not enlarge the band or stones.
Specific measurements provide a better constraint than relying only on words such as “small” or “delicate.”
AI-generated product photos should still be reviewed against the real item before publication, especially when product dimensions, materials, or design details influence a purchase decision.
You can try it directly using the tool on the right.
Turn a Product Cutout into a Shopify Jewelry Photo
The original image establishes what the ring looks like. Its product specifications help control scale, while the model and photography instructions turn that reference into a useful Shopify lifestyle image.
Use the same structure with your next ring, bracelet, necklace, or pair of earrings: upload a clear reference, enter the real product details, and describe the finished photo you need.
Create an AI jewelry product photo with WeShop AI GPT Image 2